ISO help/advice cooking a whole chicken

The friendliest place on the web for anyone that enjoys cooking.
If you have answers, please help by responding to the unanswered posts.

Jenny N

Assistant Cook
Joined
Nov 8, 2011
Messages
2
I am a newly wed and i am still learning really how to cook (even though im 30 lol) but i am baking a whole chicken for the first time tomorrow for dinner. Does anyone have seguestions on how to cook it? i am looking for something simple to start with, like a basic Recipe would be great. Thanks in advance :chef:
 
Depending on the chicken you have you might or may not want to add some fat. i.e. some butter or some mayo. Just rub it all over. Use the seasoning you like sprinkle all over the bird, put it on a oven rack or a bking sheet cover with foil, 400 deg for an hour, take the foil of for the last 15 minutes. Doesn't get any easier.
 
I know this recipe is on this site somewhere... Did you do a search for a Roast Chicken recipe?

Perfect Roast Chicken
A properly roasted chicken is so easy to prepare, and always SO delicious ­ brown, crispy skin and juicy, succulent meat. And it makes the house smell SO good!
4 to 6 servings, depending upon what you serve with it
1 free-range roasting chicken (5 to 6 pounds)
2 tablespoons extra virgin olive oil
Sea salt & freshly ground pepper to taste
2 whole heads plump fresh garlic, unpeeled, cut in half horizontally
several sprigs of fresh rosemary
several sprigs of fresh thyme
several sprigs of fresh marjoram
several sprigs of fresh lavender greens (if you can find a plant)
1 cup cold water or white wine (to baste the chicken)

1. Preheat the oven to 375 degrees F. Start by rinsing the chicken inside and out with cold running water. Drain it well and dry inside and out with paper towels. Make a mixture of about
2 teaspoons freshly ground pepper and 1 tablespoon of coarse sea salt in a small bowl. Place the bowl alongside a shallow 9 x 14-inch roasting pan. Put the olive oil in the pan and distribute evenly. You will also need a 3-foot length of kitchen string.

2. Put the chicken into the pan and turn to coat well with the olive oil.
Season it generously, inside and out with salt and pepper. Put about half of the herbs inside the cavity. Truss with string.
3. Place the chicken on its side in the pan. Put the halved garlic heads (cut side up) and the remainder of the herbs into the pan alongside the chicken. Place the pan on a rack in the center of the oven and roast, uncovered, for 20 minutes. Baste the chicken with the water and roast for another 25 minutes. Baste again ­ this time with the juices in the pan— turn the chicken to the other side, and repeat the process. This will take a total of 90 minutes roasting time. By this time the skin should be a deep golden color. Test to see if the juices run clear when you pierce a thigh with the point of a knife.

4. Remove the pan from the oven and transfer the chicken to a platter on which you have placed an overturned salad plate. Place the chicken at an angle against the edge of the plate with its tail in the air. (This retains moisture because the juices flow down through the breast meat.) Cover the chicken loosely with foil. Let it rest for at least 10 minutes or up to 30 minutes. The chicken will continue to cook as it rests. Reserve the roasted garlic to serve with the chicken.

5. To prepare a sauce, remove the herbs from the pan and skim as much fat as possible from the pan juices. Place the roasting pan over medium heat and scrape up any brown bits that cling to the bottom. Cook for 2 to 3 minutes, scraping and stirring until the liquid is almost caramelized. Do not let it burn. Spoon off and discard any excess fat. Add several tablespoons cold water to deglaze (hot water would cloud the sauce), and bring to a boil. Reduce the heat to low and simmer until thickened, about 5 minutes.

6. While the sauce is cooking, carve the chicken and arrange it on a warmed serving platter along with the garlic.

7. Strain the sauce through a fine-mesh sieve and pour into a sauceboat.
Serve immediately with the chicken and the halved heads of garlic.
copyright Feastivals 2001
 
Here is a Chicken I cooked a while back; I cooked it on the
grill, but you should be able to do the same thing with it in
the oven...it cooks very evenly this way and all the skin gets
crispy, as none of it will be sitting on the bottom of a pan the
way it does when cooking it whole.

Back about 1984 or thereabouts....I went to a new fast food type restaurant,
called....El Pollo Loco.....which means; The Crazy Chicken.
It tasted pretty good...and I noticed it was VERY flat....so I tried to get a
view of where they were cooking it to see what they were doing.
They were grilling the Chickens "butterflied" ...with the wings removed.

So the next time I cooked a Chicken I split it down the breast and opened it
up on the cutting board; and using both hands I pressed down very firmly
breaking all the rib bones...so the Chicken lay very flat.

I liked the way it turned out; and have been doing it that way ever since.

Here it is just after putting it on the grill...I had removed the Breast bone
and you can see it cooking (for a snack) with the wings.

79110669.jpg


I turned it over to give it a nice sear...then moved it to the side to
finish it by Indirect heat.

26254420.jpg


Here it is on the cutting board rested and now ready to be cut up.
98af.jpg


Here is the results...some sliced breast meat & a leg quarter & wing,
it was very juicy and tasty.

100xs.jpg

.
 
A brine will help keep the meat from drying out and pack in the flavor beyond the skin. There are trillions of brine recipes out there, you can find many. basically you just need water, salt, sugar, and a few herbs and spices. For me, thyme, rosemary, whole peppercorns, bay leaf, salt, sugar, a couple smashed garlic cloves, the juice of and a lemon cut in half, and water does a perfect job. mix it up, soak the chicken overnight, dry it off, butter mixed with a little seasoning spread under the skin on the meat, then roast it. You can stuff the cavity of the bird with stuff but I keep it minimal. A lemon or orange cut in half, maybe some sprigs of thyme and a few cloves of garlic.
Oh yeah a roasting rack is a must IMO. Keeps the bird up off the pan, helping cook more evenly and keep the bottom of the bird from braising instead of roasting. I'm not a fan of roasting on a bed of vegetables either. Roasting rack FTW!
 
Last edited:
The butterfly chicken is a technique called Spatchcock. There are a number of YouTube videos on how to prepare the chicken to be cooked. it's a very easy process, but requires either a sturdy, sharp knife, or a good pair of poultry shears. I just use my knife, thourgh I have used kitchen shears.

To roast a spatchcocked chicken, preheat your oven to 375' F. Rub the chicken all over with butter or cooking oil, or for a bit more flavor, rub with bacon grease (has less cholesterol than butter). Season with salt, pepper, and granulated garlic powder, with maybe a bit of thyme or rubbed sage. Place skin-side up on a jelly-roll sheet that has been covered with parchment paper. Cook for about 12 minutes per pound. Check the thickest part of the meat with an instant read meat thermometer when the time has elapsed. Remove the chicken when the meat temperature reads 160'F.

You can also dust the chicken with seasoned flour after rubbing with the butter or bacon grease for a light, crispy coating. Follow above instructions for roasting.

Another great way to roast a chicken is just leave it whole. Remove any giblets and wash inside and out with fresh water. Dry with paper towels. Roughly cut veggies such as carrots, onions, and potatoes into large chunks and place in the bottom of a greased, shall roasting pan. Rub the bird with oil, butter, or grease. Season with the previously mentioned herbs, and salt. Tuck the wing tips behind the back and place on top of the veggies. Place in a 375'F. oven and cook for 12 minutes per pound. Again, check with a meat thermometer inserted into the thickets part of the breast, and the tip placed near the leg-body joint. When the meat reaches 160', remove it from the oven and let it rest for ten to fifteen minuts before carving.

To carve the chicken, remove the legs and wings and set to the side. Cut from teh breast bone downward and remove the whoel breasts. Slice them against the grain. Remove any meat from teh back. Use the remaining carcass to make soup. Serve with sides.

There are a myriad ways to roast chicken. Some recipes call for wrapping the bird in strips of bacon, while others have you place herbs under the skin. Still others have you brushing glaze onto the skin every ten minutes or so. Adn of course there are brines and marinades to consider.

My recomendation is to keep it simple until you are comfortable roasting the chiken, and know how it reacts to different cooking temperatures. When you are confident that you will come out with juicy, tender chicken, every time, then start trying more complex recipes.

I hope your first roasted chicken comes out incredible.

Hope this helps.

Seeeeeeya; Chief Longwind of the North
 
I like to squeeze a lemon all over the chicken before seasoning it (parsley, rosemary and thyme, + salt and pepper) and then stuff the rest of the lemon inside the cavity.
 
I just rinse it, pat it dry, put a few garlic cloves and rosemary in the cavity, rub the outside with olive oil, salt, pepper, more rosemary, then put it in a preheated oven, in a roasting pan at about 400, breast side down. I let this go for about 20 minutes, then carefully suing tongs, turn it over, making sure not to break breast skin, and turn the heat down to 375. I roast this for another hour or so, and every 15 minutes I use a soup spoon and baste it. If it seems to be turning a bit too dark, I will turn the heat down to 350 and let it finish. You can tell when it is done by pulling at the leg. If it is still very stiff at the joint, then it is probably not done yet. If you want the skin to be crispier, crank the heat back up and keep an eye on it.
 
"Spatchcock" or "Butterflied" Whole BBQ Chicken layered with Bacon
The term "Spatchcock" comes from 18th Century English and means simply, a fowl that has been split to cook over a fire. There are a dozen different definitions of the term, but that's as close as I've ever needed.

Butterflying a chicken is easy and requires only a good pair of sharp Kitchen Shears or a sharp knife and a safe, steady hand. (Please use scissors so as to not cut yourself)

1) The chicken should be breast down. This means the legs are under the bird, and the wings are on top.

2) Start cutting at one side the neck, just beside the backbone.

3) Cut through the ribs right along the backbone.

4) Continue the cut until it has been made all the way from front to back.

5) Start the second cut just on the other side of the backbone and do the same thing from front to back.

6. You can either just turn the Chicken over and press firmly over the neck area to "crack" the breastbone, or you can remove the breastbone easily by sliding your finger under it until you can gently pry it from the bird. Either method works fine.

7. The chicken should be resting on the insides of the bird, with the skin side up.

8. Now, to prevent over cooking of the breast meat while the legs and thighs cook completely, it's important to "stuff" the breasts with a butter herb mixture or some bacon.

To do this, just GENTLY push your finger between the skin and the breast meat, causing the skin to separate from the meat WITHOUT tearing the skin.

Do this until the entire breast area has the skin loose. Then, gently push some butter/herb mixture under the skin in generous amounts, while gently pushing from the top as well, until the entire breast area is covered, OR push doubled slices of bacon under the skin until the breast area is covered with the bacon between the skin and meat.

9. Now you're ready to season the bird! Many "rubs" are available at the store, or, you can just mix all the seasonings you enjoy on chicken, together at once, and rub it all over the inside and outside of the chicken until it's thoroughly covered. Do this in a manner that won't dislodge the bacon or butter over the breast areas and then put the chicken back on the work surface, skin up.

10. Now, cover the entire bird with slices of bacon. All of it. No gaps, one layer.

11. The bird is ready to cook. While it rests and the seasonings work into the meat some, start the coals for your BBQ.

Indirect cooking on the BBQ is best for this type of cooking. All you have to do is get enough coals going to last an hour. About 20 briquettes is usually enough. If you've planned ahead, you'll also have some wood (cherry or hickory work great) soaked for 24 hours in plain water.

Once all of the coals are uniformly grey, push them to the outside of the grilling area. Place a pan with an inch of wine, juice or broth, under the grill, inside the perimeter of coals.

Place some soaked wood on top of the coals, but not dripping them out. I lay mine out to drain when I start my coals. Just a couple pieces of wood will do. You don't want your meat tasting like firewood.

Now, put the grill on the BBQ and place the bird gently on the center, over the pan.

Put the lid on with all vents wide open.

DO NOT REMOVE THE COVER AGAIN until 60 minutes has passed.

Open after 60 minutes, test the meat by poking the thickest part of the leg with a knife tip, all the way to the bone. If the juices run clear, it's done. if there is still blood showing in the fat, then close the cover and cook longer.

****

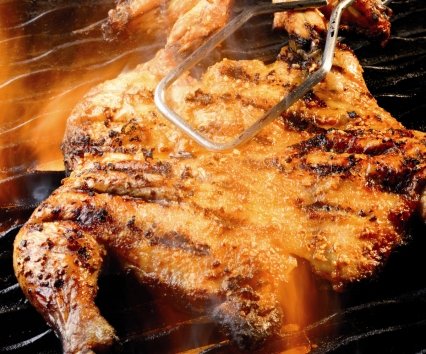
That's it! How easy is that? Once you've tried a BBQ chicken this way, you'll be hooked. It makes it look better, and cook better. The breast meat isn't over cooked and the legs and thighs are fully cooked.

The bird is seasoned well and the bacon has given it an additional flavor that is just fantastic.
 

Attachments

  • Raw Spatchcock Chicken.jpg
    Raw Spatchcock Chicken.jpg
    67.6 KB · Views: 327
  • spatchcock-chicken.jpg
    spatchcock-chicken.jpg
    169.8 KB · Views: 197
It's carefully explained to make the cuts along the BACKBONE, so I don't understand where you're coming from on this ChefJune.

The OP's cut was through the breast rather than at the back. Either way you get a flat chicken to cook.
 
Thanks for explaining that, Andy. I hadn't noticed the first photo showing it split in the front. WAY easier to follow the backbone for the two cuts.:chef:

Its easier plus you get rid of the backbone, which seems like the whole point of spatching a bird.
 
This is Jenny N.'s very first attempt at roasting a chicken.

Personally, I think it's important to keep your first attempt very simple.

Concentrate on seasoning and doneness.

Make sure you season the bird well with salt and pepper and make sure you dont overcook it.

Once youre comfortable with a simple well-seasoned and properly cooked bird, then venture into the world of spatching, brining, and more labor intensive preparations.
+1
 
There are a couple of posts on the first page that admonish the same idea. Start with easy recipes. As skill and confidence grow, then take on more of the advanced cooking techniques.

Most people develop a favorite method/technique for roasting chickens, turkeys, etc. The most important criteria is to cook to the proper temperature before removing the bird from the oven. That temperature is 160' F. Then, let the bird rest for 15 to twenty minutes, depending on the size. Over cook it, and it will be dry and tough. Undercook it and it will taste wrong, and possibly transmit food born microbial nasties into those who eat it.

Seasoning is the second most important thing you can do. Salt is the primary seasoning, but use sparingly. Other seasonings such as pepper, rosemary, sage, thyme, garlic, etc. are all good. But you need to know their flavors, and how they compliment or clash with the natural flavor of the chicken.

Cooking knowledge is a process, and can only be really learned through experience. We can tell you what works for us. But you have to try various things and see if you like the results. You may not like the same flavors that someone else enjoys. Or you might find that the advise someone gives really makes your dish pop. And remember, when adding seasonings, you can always add more, but once its in the food, it can't be removed. So go slow. start with a little and increase as required.

Seeeeeeya; Chief Longwind of the North
 
This is Jenny N.'s very first attempt at roasting a chicken.

Personally, I think it's important to keep your first attempt very simple.

Concentrate on seasoning and doneness.

Make sure you season the bird well with salt and pepper and make sure you dont overcook it.

Once youre comfortable with a simple well-seasoned and properly cooked bird, then venture into the world of spatching, brining, and more labor intensive preparations.

Thanks jennyema, and I agree, but remember that spatching a bird allows it to cook with much more chance of success on the first try and there are only 2 easy to perform steps in spatching the bird.

1. With kitchen shears, cut along the backbone on both sides and remove the backbone.
2. Spread the bird on a hard surface and press until the breastbone snaps.

The only way that could get easier is if it was purchased cooked already.
 
Back
Top Bottom