Need help with white bread recipe

The friendliest place on the web for anyone that enjoys cooking.
If you have answers, please help by responding to the unanswered posts.

Kat

Assistant Cook
Joined
Jan 18, 2006
Messages
43
i have made the white bread recipe from the bread baker's apprentice a few times now, and i'm not sure if i'm getting the results i am supposed to. i use the second version so i can use up buttermilk after making the cinnamon rolls, haven't tried the other two yet. the flavor of the bread comes out great, a little sweeter than i would like for sandwich bread, but it's great for toast and snack bread. the problem is it is somewhat heavy and not very airy. the top of the loaf only gets to be about 4 inches high total. does anyone know if this is how it is supposed to be? i've followed the directions very closely and let it rise both times in my oven that i had at 400 degrees for a minute then turned off, somewhere it suggested that i believe. i use a KA Pro 6 qt mixer with the spiral dough hook that i kneed for the suggested 6-8 minutes, could that be too much maybe? i also use king arthur bread flour, and everything is room temperature.

anyone got ideas, or maybe another recipe that is more along the lines of sandwich bread, the guys in my household are looking for sandwich bread. not totally like the supermarket stuff, but similar.

thanks-
katie
 
:) You can cut back the sugar if it's too sweet for you and I really think you should take it out of the mixer after mixing it in there and kneading by hand a few minutes until it's smooth and somewhat satiny.I would also not rush the rising and let it rise slowly on a warm place in the kitchen until doubled shape loaves and let rise again and bake.
If you give us the recipe we can see whats really going on.
I think it might be you are not kneading it enough.
Check out this sitebaking911homepage
Go to the top and click bread then click on solutions and then to trouble shooting.
 
Last edited:
Kat said:
i have made the white bread recipe from the bread baker's apprentice a few times now, and i'm not sure if i'm getting the results i am supposed to. i use the second version ... the problem is it is somewhat heavy and not very airy. the top of the loaf only gets to be about 4 inches high total...let it rise both times in my oven that i had at 400 degrees for a minute then turned off, somewhere it suggested that i believe. i use a KA Pro 6 qt mixer with the spiral dough hook that i kneed for the suggested 6-8 minutes, could that be too much maybe? i also use king arthur bread flour, and everything is room temperature.
katie
hi Kat,

I have The Bread Baker's Apprentice so I looked at the recipe you're using. Have a few thoughts...

> preheating the oven may be making the rising temp too high and could be killing off some of the yeast. What is the approximate temperature of your kitchen? Unless it is cold (low 60s F or below) just let it rise at room temp as the recipe says.

> what size loaf pans are you using? If the pans are too big for the size of the dough, this could be part of the problem. However, I do think that preheated oven for your rising environment is the more likely culprit

> 6-8 min of kneading with the KA spiral dough hook is ample - this is not the problem

> on sugar - agree that 3 TBS sugar for 2 pounds dough that's just supposed to produce white sandwich bread seems rather a lot; reduce or eliminate as you see fit

============================
PS Here's my link to the all-purpose bread I made when my kids were growing up. For 15 years, it never failed me
 
Last edited:
Make this Bread and help Kat

The recipe Kat is using is:
4-1/4 cups [19 oz] unbleached bread flour
1-1/2 tsp [.38 oz] salt
3 TBS [1.5 oz] sugar
2 tsp [.22 oz] instant yeast
1 large [1.65 oz] egg, slightly beaten, at room temperature
1/4 cup [2 oz] butter, margarine or shortening, at room temp or vegetable oil
1-1/2 cups [12 oz] buttermilk or whole milk, at room temp (Kat is using buttermilk)
I cannot give the instructions (copyright problems!) but this recipe is from The Bread Bakers Apprentice by Peter Reinhart, pp266-268.

Kat has 2 problems with this recipe, one major and one minor:
> major problem re rising
the problem is it is somewhat heavy and not very airy. the top of the loaf only gets to be about 4 inches high total.
> minor problem re sweetness
(it is) a little sweeter than i would like for sandwich bread
I intend to make this recipe and post my results to this thread. Other readers who have this book are encouraged to do the same.

Since Kat finds the recipe too sweet, I will reduce the sugar by 1/2. Otherwise it will be made as written. I do have to buy some buttermilk to make the recipe so I hope to post my results in about a week.

Please join me in this trouble-shooting exercise. If you have the book, make the recipe and post your results to this thread.
 
Last edited:
Buttermilk White Bread - part I - Equipment

in the first post in this thread, Kat said
i have made the white bread recipe from the bread baker's apprentice a few times now, and i'm not sure if i'm getting the results i am supposed to... the problem is it is somewhat heavy and not very airy. the top of the loaf only gets to be about 4 inches high total.
On 03-04-2007 I promised to make this bread. I have now made this recipe 2 times . I also took many photos which I will include in subsequent posts.

In order to help Kat with her problem, I tried to use similar equipment.
i use a KA Pro 6 qt mixer with the spiral dough hook
I used my KA 5-quart mixer (model K5SS).

Kat's KA mixer has the spiral dough hook
kitchenaidSpiralDoughHook.jpg
whereas mine has the "C-type" dough hook
kitchenaidCtypeDoughHook.jpg.

The spiral dough hook is supposed to be more efficient in kneading dough. Otherwise our mixers are pretty similar.

I used 2 pyrex loaf pans (1.5 qt. capacity - 8.5 x 4.5 x 2.5 inches) for baking.

I measure most ingredients by weight, so I also used a kitchen digital scale.

I will be posting a detailed discussion of the recipe and procedure as soon as I can organize my thoughts and photos. Stay tuned...

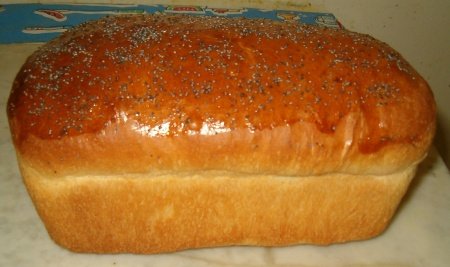
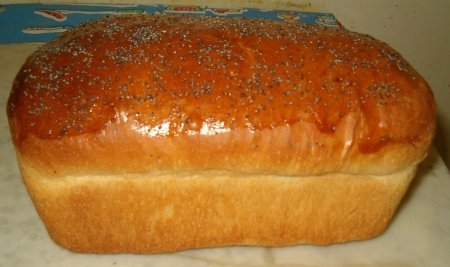
PS The recipe does work. Here's a photo of a finished loaf...
buttermilkWhiteLoafBread-10a.jpg
 
Last edited:
Flat, heavy bread is usually the result of:

A: The yeast isn't good
B: The yeast is killed before it has a chance to rise from too much heat
C: The flour has too little protien (gluten) in it
D: The dough is too dry
E: The dough hasn't been kneeded enough to develop the gluten
F: Too much fat has been added to the recipe

A: It's always a good idea to proof the yeast by mixing the sugar and yeast together and disolving in water who's temperature reads between 100 and 110. It should develop a substatial foam and smell yeasty after only a few minutes.

B: I have ruined many a loaf from trying to let dough rise in a warm oven. If the oven gets too hot, that heat will kill the yeast. I have achieved my best dough rising success by placing a wide, shallow plastic bowl, half filled with water, into the microwave and heating until it just begins to boil. I then place my larger bowl on top of the other and close the microwave door. The latent heat from the once boiling water is sufficient to really excite the yeast, without cooking them.

C: All purpose flour has the minimum require gluten to produce good bread. Bread flour has even more and is required for good baguettes, and most artisan style breads. The glutenous (elastic) nature of the dough captures more Co2, which results in greater rise, and lighter final product.

D: The dough should be slightly sticky when worked. And the only way to know if your dough has the right texture is to work it with your hands.

E: And just for the record, it is nearly impossible to overwork (kneed too much) the dough. It must be kneeded to create the required elasticity. The bread will not toughen as the time required for the dough to rise will allow the gluten strands to relax, but without giving up the Co2 that creates the thousands of tiny gas bubble that give bread its texture.

F: Too much fat inhibits the elasticity, and creates a tough, hard to work dough. Too little fat results in a dry laf of bread that will such the moisture right from your mouth. As a good general rule, add about three tablespoons oil for every cup of flour.

Now go, bake bread, and conquer the universe.

Seeeeeeya; Goodweed of the North
 
You are following the instructions. If it says "let rise an hour, punch down, etc." , you need to let rise until doubled, punch down, form your loaves and let rise until it is the height of bread you want. THEN put it in the oven and bake it. With bread there is no magic time that will be the time to let it rise. It will do it as it grows.
If you do this already and are still not satisfied, then disregard my try at helping.
 
subfuscpersona, Beautiful loaf. All problems should be solved.
 
Buttermilk White Bread - part 2 - Ingredients and Measuring

The recipe Kat is using is a white loaf bread variation from Peter Reinhart's The Bread Baker's Apprentice on p.268.

The recipe makes 2 pounds of dough for 2 one-pound loaves. The dough is soft and malleable. The recipe uses the straight dough method, which simply means that all ingredients are combined (and kneaded) to make the dough. The dough has 2 rises, one in the bowl and one in the pan.

I measured the major ingredients (flour, buttermilk and fat) by weight using my scale. Salt, sugar and yeast were measured by volume.

Kat said she found the recipe as written slightly too sweet. I therefore reduced the amount of sugar somewhat but otherwise kept close to the original recipe ingredients and instructions. Here they are...

[SIZE=+2]Ingredients[/SIZE]
4-1/4 cups [19 oz] unbleached bread flour
I used Gold Medal bread flour​
1-1/2 tsp [.38 oz] salt
since kosher salt is the standard salt in my kitchen, I increased the amount of salt to 2 tsp​
4 tsp sugar (that's 1 TBS plus 1 tsp)
the original recipe calls for 3 TBS sugar​
2 tsp [.22 oz] instant yeast
instant yeast is designed to be added directly to dry ingredients. Unlike active dry yeast, it does not have to be dissolved in water first. If you use active dry yeast, I would suggest measuring your liquid and then removing 2 TBS from the total amount. Then take 2 TBS of warm water and dissolve the active dry yeast in the water (about 5-10 minutes). Then add the dissolved yeast with the water back into your liquid. Generally, when a recipe calls for instant yeast, but you only have active dry yeast, the amount of yeast is slightly increased. One package of active dry yeast would be about right. For instant yeast, measure by the teaspoon since one package of instant yeast has slightly more than 2 tsp. However, don't agonize over the amounts. This bread is designed for fairly quick risings.​
1 large egg , slightly beaten
1/4 cup [2 oz] butter, margarine, shortening or vegetable oil
I used shortening​
1-1/2 cups [12 oz] buttermilk or whole milk
I used buttermilk since that is what Kat used and the whole point of this exercise is to reproduce the recipe as kat makes it in order to troubleshoot.​

===================
It is important that ingredients that are normally refrigerated (the buttermilk, egg and solid fat) be allowed to come to room temperature before beginning to mix your ingredients.
 
Last edited:
thanks for the replies everyone and the troublshooting advice, it's a great help. the loaf that subfuscpersona made looks like i want it to. i was originally putting it in a warm oven becasue i wasn't sure if the room temperature was enough, it was really cold here in minnesota last month. i have been wanting to try making another batch, but some family issues came up and haven't had time yet. i'm going to make some more this weekend and use the suggestions everyone has given. i'll post up results sometime this weekend. i think i'll pick up a kitchen scale this weekend too and try doing it by weight. i appreciate the help.
 
Kat, if you are unsure about the temperature of the room in which you are allowing your bread to rise in, you can do what I do. I use my microwave oven as a proofing box.

I must preface this by saying I usually use my bread machine to so the mixing, kneading and first rising of my dough. This is because I've learned that the machine does a better far job of kneading than I could ever do and, also, because my hands can't handle the pressure of kneading any more.

Once the dough has been kneaded and risen the first time, I shape the loaves and place them in the microwave for the second rise.

Before I put it in the microwave for that period, I heat about 2 cups of water on HIGH power for 2 minutes. I leave the container of water in the oven and then place the dough in for its last rise.

You say you live in Minnesota. I have lived there, too, and know how cold it can be there...even in the house. Having said that, I will tell you that my house, even though I live in Kentucky, is quite cool in the winter months because of the age and contruction of the house. Most of the time the temperature of my kitchen rarely reaches 60 degrees F in the winter.

Just keep on working on making your bread. Don't give up. You'll be just fine.
 
Kat said:
thanks for the replies everyone and the troublshooting advice, it's a great help. the loaf that subfuscpersona made looks like i want it to. i was originally putting it in a warm oven becasue i wasn't sure if the room temperature was enough, it was really cold here in minnesota last month. i have been wanting to try making another batch, but some family issues came up and haven't had time yet. i'm going to make some more this weekend and use the suggestions everyone has given. i'll post up results sometime this weekend. i think i'll pick up a kitchen scale this weekend too and try doing it by weight. i appreciate the help.

Making baked goods by weight is a good technique, but not entirely "required". Many of us have been baking for decades following recipes with volume measurements with good results. I would just refer you back to my other post. Let your bread rise as much as it needs to, regardless of time. If your kitchen is cool, it will take longer. You can make a bit of a "rising oven" as you are doing.
If you really want a scale, you can get a very good one on Amazon for $20. Be sure to check the Friday Sale today.
 
Buttermilk White Bread - part 3 - Instructions (mixing & kneading)

My post #9 gave the ingredients and discussed measuring. We now proceed to...

[SIZE=+2]Instructions (mixing & kneading)[/SIZE]

The buttermilk and shortening were weighed and they, along with the beaten egg, were allowed to hang out at room temperature, since flour has trouble absorbing cold ingredients.

The dry ingredients were added to the KA mixer bowl (the flour was weighed, I just used my measuring spoons for the other dry ingredients).

Using the flat beater on speed 2, the dry ingredients were mixed for about 1 min, and then the wet ingredients were added (still beating on speed 2) in this order
  1. buttermilk
  2. beaten egg
  3. shortening
and everything was mixed for 1-2 min until it all balled up in the paddle. I then scraped the dough off the paddle, and switched to the dough hook. At this point the dough was rough but soft enough that it certainly didn't strain the motor to mix it with the paddle. It looked like this
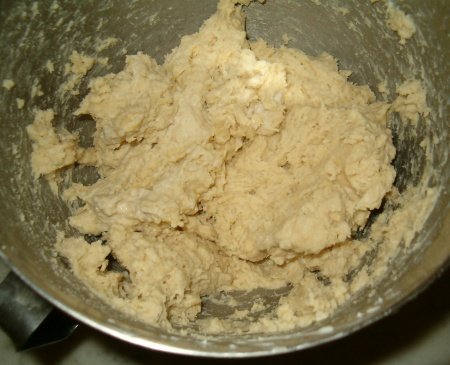
buttermilkWhiteLoafBread-01.jpg

This dough was kneaded with the dough hook for 5-6 minutes on speed 2. It did ball on the hook and at the end of the mixing period looked like this
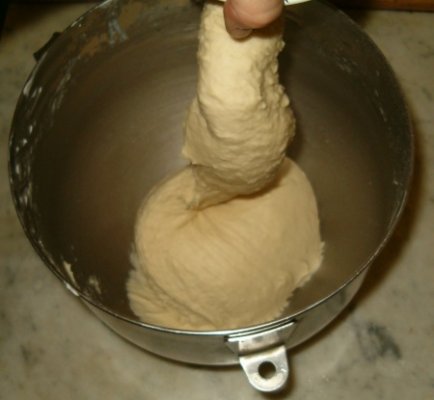
buttermilkWhiteLoafBread-02.jpg

The dough was removed from the bowl to a *lightly floured* board for final hand kneading.

We now come to an interesting point. Remember, I made this recipe 2 times, one day apart. The ingredients (including brands), the temperature (low 70s F) and procedure were identical on both days, however, dough #1 was actually stickier than dough #2 (of course, didn't know that on day one when I was making it for the first time :rolleyes: ).

I did notice that dough #1 was a little sticky (it really gripped the board) but instead of adding more flour while kneading (this was the first time I'd made the recipe and I didn't know how the dough should actually feel) I covered it with plastic wrap and let it rest on the board for about 30 minutes. Sometimes flour just needs time to absorb wet ingredients.
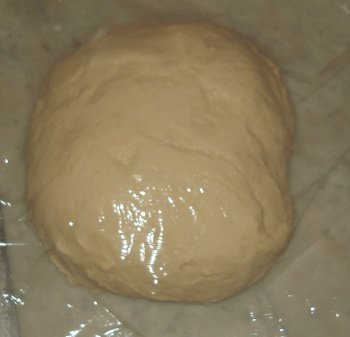
buttermilkWhiteLoafBread-03a.jpg
After this resting period, the dough was firmer and I could hand knead it without having to add flour beyond a tiny amount (?maybe 2 tsp) on the board. I hand kneaded for about 3 minutes.

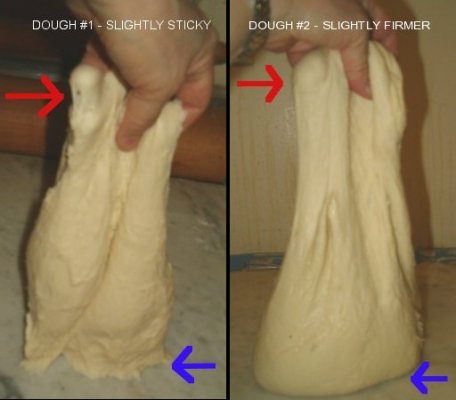
It turns out that dough #1, even with this resting period, was still slightly wetter than dough #2 after both had been kneaded by machine and then a few minutes more by hand. Look at the photo below (in both cases I'm just lifting the rounded ball of dough up off the board)
buttermilkWhiteLoafBread-04.jpg
The blue arrow in #1 shows the dough gripping the board while in #2 the dough remains rounded. The red arrow in #1 shows the dough starting to tear away from my fingers while in #2 its still holding. I could lift dough #2 off the board without it leaving a residue.

The most likely cause of the difference in the doughs is that the wet ingredients were still somewhat cold the first time and even the resting period didn't fully correct this. A 2nd possible cause is that I *may* have machine kneaded dough #2 slightly longer.

At any rate, it made little difference in the final bread. Both baked up fine. Just wanted to point up how small differences in procedure and technique can affect the dough.

The kneaded dough is soft, light, and slightly tacky, just the way the recipe says it should feel. Both doughs passed the windowpane test.

We've reached the end of the discussion of kneading. Stay tuned for part 4 which covers rising times, shaping and baking.
 
Last edited:
Buttermilk White Bread - part 4 - Instructions (rising and baking)

My post #13 discussed mixing and kneading. We now proceed to...

[SIZE=+2]Instructions (rising and baking)[/SIZE]

The mixer bowl was lightly oiled and the dough was set to rise in it, covered with plastic wrap. BTW, rising dough gives off heat, so I always put a big rubber band around the plastic wrap in order to trap that heat. That way the dough itself creates the perfect temperature for it's own rise.

Rising temperatures were at all times in the low 70s F (probable range 70 - 73 F).

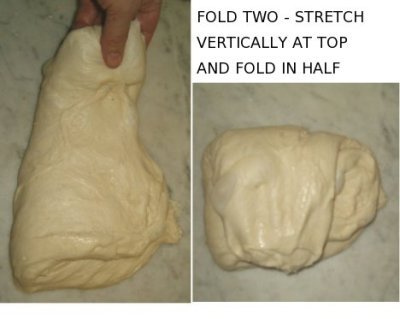
After about 1 hour, the dough had risen about 1-1/2 times the original bulk. At this point I scooped the dough on the board and gave it a few strech and folds. This is a well-known technique for assisting the rise of bread dough. It gently redistributes the yeast (so they have a new food source), strengthens the gluten and deflates any large air bubbles. Most bread doughs react very well to it and here's how it works...
The Stretch and Fold Technique
==============================

When the dough has risen to about 1-1/2 times it's original size, gently scoop it out onto an unfloured board. You are going to gently stretch and fold it 2 to 4 times.
Fold One > Stretch the dough horizontally to the left, pick it up and fold it over like this
foldOnBoard-1.jpg
Fold Two > Stretch the dough vertically from the top and fold it over like this
foldOnBoard-2.jpg
You may stop at this point or do two more folds. Fold Three would be horizontally to the right and Fold Four would be vertically from the bottom.
==============================
I gave the dough four folds and then returned it to the oiled bowl, recovered it (with that rubber band in place!) and let rise again to about 2 times the original bulk.

In the meantime I greased my pans. I also decided to give the dough an egg wash and sprinke it with poppy seeds so I cracked another egg into a small bowl and beat it a bit so it would be ready.

It took about an additional 30 minutes for the dough to double. It was now ready to be shaped for the second (and last) rise in the pans.

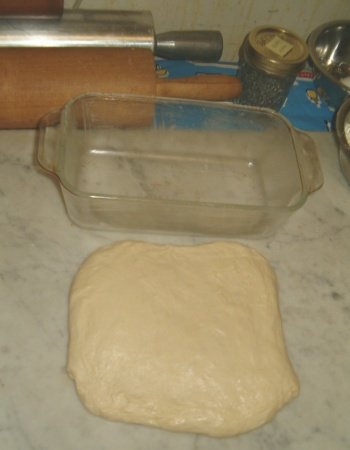
The dough weighed 2 pounds. I divided it in half using my scale. I shaped each half into a rough ball, covered them loosely with plastic wrap and let them rest on the board for about 15 minutes to relax the gluten so the dough would be easy to shape. (I used this time to wash the bowl and tidy up.) After the dough had rested, on an unfloured board, I gently patted and pulled the dough ball into a rough rectangle about the width of my pan and about 3 times as long as the pan's bottom width.
buttermilkWhiteLoafBread-05.jpg
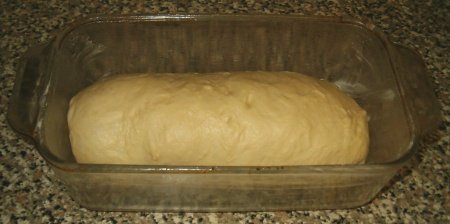
It was then shaped and placed, seam side down, in the pan. The dough at this stage filled the pan's capacity by about one half.
buttermilkWhiteLoafBread-06.jpg

Both pans were lightly covered with plastic wrap and left to rise at room temperature. In about 1-1/2 hours the dough was cresting about 1 inch over the top. The oven had already been preheated to 350 F.

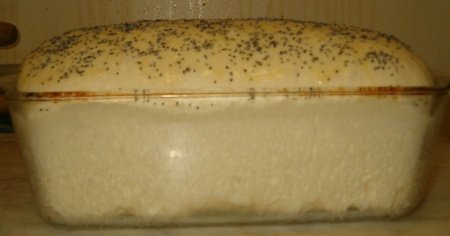
The top of the dough was lightly brushed with egg wash and sprinkled with poppy seeds.
buttermilkWhiteLoafBread-07.jpg

The bread baked for 45 minutes at 350 F and was then turned out onto a rack to cool. There was very little oven spring ("oven spring" is when the dough continues to rise somewhat in the oven during baking).

The DC forum seems to limit the number of photos per post, so pictures of the finished loaf plus my evaluation of the recipe will have to wait for one more post.

Stay tuned...
 
Last edited:
Buttermilk White Bread - part 5 - Recap and Evaluation

[SIZE=+2]Recap[/SIZE]

Kat, the original poster, was having trouble with an inadequate rise for her buttermilk white loaf bread. She had already successfully made cinnamon rolls from the same book (The Bread Baker's Apprentice by Peter Reinhart). She wished to use buttermilk as the liquid and she had already reduced the amount of sugar called for, since she felt the bread turned out too sweet. She was aiming for an all-purpose white loaf for toast, sandwiches and snacking.

Even an experienced baker can have problems with an unfamiliar recipe, so in post #4 I promised to "make this recipe and post my results to this thread" (I have the book but had never made this particular recipe). As the saying goes, the devil is in the details, so I wanted to duplicate the recipe and technique as closely as possible, erring on the side of too much information rather than too little and including photos where possible. This would (hopefully) assist Kat to pinpoint what went wrong.
Post #5 covered equipment
Post #9 covered ingredients and measuring
Post #13 covered mixing and kneading
Post #14 covered rising and baking

...so now it is time for the...

[SIZE=+2]Evaluation[/SIZE]

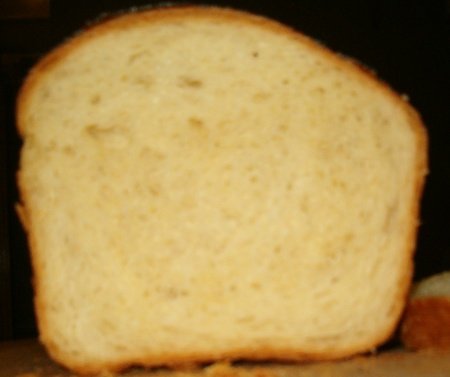
The recipe produced two well formed light loaves, with a thin, crisp golden crust and a very soft, airy, close crumbed, slightly moist interior. While there was little oven spring, the loaves from batch #1 were about 5" high and the loaves from batch #2 were about 4-3/4" high. I threw in an optional step of brushing the top of the loaf with beaten egg and sprinkling with poppy seeds prior to baking. The egg wash contributed to the slightly darker color on the top of the loaf.
buttermilkWhiteLoafBread-08.jpg buttermilkWhiteLoafBread-09.jpg (sorry the focus for the interior isn't better)

This is a perfectly serviceable white bread with a mild, pleasant taste. Since both buttermilk and shortening tend to produce a very soft interior, it might not hold up to refrigerated peanut butter without tearing the bread but otherwise, if you and yours like white bread, it would be fine for toast and sandwiches. Other bakers might not want to reduce the sugar as much as I did. Using butter (rather than shortening) would probably add to the taste.

Reinhart also recommends variation #1 of this recipe (there are 3 variations) for hot dog or burger buns or rolls. The buttermilk variation I made might be a little soft for buns but I think it would make lovely dinner rolls.

The only real objection I have with the recipe is the straight dough method. It's rather inconvenient to hang out for about 2 hours (or more, if your rising temperature is lower than mine was) for the dough to rise in the bowl. With this recipe, the flavor might not be improved by a refrigerator rise, but flexibility in timing certainly would be. It is almost always possible to slap a rising dough (during the "rise in the bowl" phase, *not* the "rise in the pan" phase) in the 'frig if you have other things to do and want to extend the rising time. ( Reinhart is a great advocate of a refrigerator rise; it is discussed extensively in his books and I'm sure readers could find pointers for using this technique with this recipe).
 
Last edited:
Back
Top Bottom