Bread Making Invite 4 All - a Collaborative Bread Thread

The friendliest place on the web for anyone that enjoys cooking.
If you have answers, please help by responding to the unanswered posts.
thanks subfusc. i was finally able to find the kneader paddle for my breadmaker (the breadman plus tr-700) at culinaryparts.com. so i will hopefully be joining you in the bread experiments soon. i would love to make bread by hand from scratch, but my time is so limited that the best i might do is with the help of the breadmaker.
 
pancake on 05-Feb-2005 said:
Hey there I have finally got myself working on my BREAD !! I think I messed up something in the middle, so I'd love to hear your advice :D

Ok, so i made the "Baguette" recipe posted on page 2 of this thread starting with the Patte Fermente. I made it as directed, put in an oiled bowl and it came out beautiful. I went on making the bread dough, kneaded it in the machine for about 6 minutes and with my hands for another 2 minutes, it was perfectly smooth. I oiled my bowl ( I think I over-oiled it actually) and each time I was checking on the dough, it rises perfectly but it was so oily that makes it hard to handle.. So anyways, I formed my baguettes with alot of difficulties because of the oil on the dough. I was afraid to add alot of flour, so I just formed them very messily :?

I let them rise again, they did well. I Baked them in a 450 Oven (well sprayed and moist) for about 18 minutes , they started to brown alot so I lowered the temperature to 375 and baked them for another 5-7 minutes.

The end Result:

The bread's Flavor was so good I couldn't beleive how I actually ever thought I made baguettes withour Patte Fermente before!! they were so tastey and the crust was perfect, color was perfect..
here comes the problem...
They were so dense :( :( I'm guessing it's the oily bowl, or now I'm guessing maybe I under-cooked them ?? :cry: :cry: It's so bad because the taste is so rich but the texture is so heavy and dense..

What do you all think ?
Thanks!

hi pancake

I was hoping that some person who's actually made baguettes (from any recipe) would reply but apparently *not*, so here's my take your problem...

I think you were right when you thought your problem came from "over-oiling" the bowl, but it is not the amount of oil per se that is the issue but the fact that
I formed my baguettes with alot of difficulties because of the oil on the dough.
.

PROBLEM #1 (???)
What I suspect happened is that, due to the difficultes of shaping the baguettes after their rise "in the bowl", you "deflated" the dough, that is, during shaping, you got rid of a lot of the air holes that were in the dough.

I know you don't have the book, but on page 67 it shows a cross-section of "raw French dough" and you can see from this pix that there are a lot of gas pockets in the dough...
rawdoughcrosssection8pb.jpg


If you look closely at step 5 of Baguette Recipe from Peter Reinhart's Breadmaker's Apprentice (posted 11-Jan-2005 on page 2 of this thread)...it pretty much emphasizes that the handling of the dough from this point on must be very gentle in order not to get rid of all those lovely gas pockets that have formed.

PROBLEM #2 (???)
You may have underbaked them, since you say that
I Baked them in a 450 Oven (well sprayed and moist) for about 18 minutes , they started to brown alot so I lowered the temperature to 375 and baked them for another 5-7 minutes.
whereas the recipe says to preheat the oven to 500F (not the 450F you started with) - after the initial spraying technique, the recipe says to lower the heat to 450F (not the 375F you used).

===========================
> has this been helpful:?::?::?:

Do give it another try! Tell us how it came out :D :)
I've actually been much more chicken than you since I've not yet gotten up my courage to bake a bread directly on a baking sheet or stone (you are using this method - aren't you?) - my recipe still uses a loaf pan for baking, so I'm not dealing with shaping a "free-form" loaf and then getting it into the oven - all of which are steps which can "deflate"
the dough.

Many thanks for posting :!:
 
Subfuscpersona Thank you so much for your help and response :D You really helped! Thanks for posting the picture, previously mine would look like that :cry: I'm guessing I did underbake it, and I deflated the dough too much, but I am trying it again over the weekend. The flavor was just perfect I mean it really tastes like baguettes!

I've made my baguettes from a recipe I got from my aunt:

1 1/4 teaspoons active dry yeast
1/4 cup, very warm water ( 105 to 115 degrees F)
3 cups, unbleached allpurpose flour
1 cup, cake flour (I think it makes a fluffier texture here or something like that--not sure but that's the recipe)
2 1/4 teaspoons Kosher salt
1 1/4 cups plus 1 tablespoon, cool water ( 75 degrees F)

Combine the yeast and the warm water in a small bowl and stir with a fork to dissolve the yeast. Let stand for 3 minutes. Combine the flours and salt in a large bowl. Pour the cool water and the yeast mixture over the flour, and mix to combine all ingredients together. Knead with machine or on a floured surface for about 8 minutes.
Place the dough in a lightly oiled bowl, turn it in the bowl to coat with oil, and cover it with plastic wrap. Let rise at room temperature for 1 1/2 to 2 hours, or until nearly doubled in volume.
Gently deflate the dough and fold it over itself in the bowl. Reshape it into a ball and cover with plastic wrap. Let it rise for 1 1/4 hours or until it has nearly doubled again.
Gently deflate the dough again, reshape into a round, cover, and let rise for about 1 hour. Place the dough on a very lightly floured surface and divide it into 3 equal pieces (about 10 ounces each).
Gently stretch one piece into a rectangle, leaving some large bubbles in the dough. Fold the top third down and the bottom third up as if you were folding a business letter. Now form the loaf into a log by rolling the dough over from left to right and sealing the seam with the heel of your palm. repeat with the remaining and each rest about 10 minutes.
Now elongate each baguette, starting with the first one you shaped, by rolling it back and forth on the work surface. Begin with both hands over the center of the loaf and work them out to the ends until the loaf reaches the desired length.
Place the loaves on a peel or upside down baking sheet lined with parchment paper and generously sprinkled with cornmeal or on a baguette pan. Cover the loaves with well oiled plastic or a floured cloth and let rise for 30 to 40 minutes until the loaves are slightly plump but still not doubled in volume. The final rise is short, because you want the baguettes to be slightly under proofed; this will give them a better oven spring, resulting in loaves with a light, airy crumb and more flared cuts.

Thirty minutes before baking, preheat the oven to 450F. Place a baking stone in the oven to preheat, and place an empty water pan directly under the stone. Use a very sharp razor blade or lame to make 3 to 5 slashes, depending on the length of your loaves, on the top of each baguette. The cuts should run from one end of the loaf to the other, rather than across it, and the blade should be held at a 30 degree angle to the loaf so that the cuts pop open in the oven. Be careful not to press down too hard, or you may deflate the loaves. Using a plant sprayer, mist the loaves.
Gently slide the loaves onto the preheated stone, or place the baguette mold in the oven. Pour 1 cup of very hot water into the water pan and quickly close the oven door. After 1 minute, mist the loaves and oven walls 6 to 8 times and close the door. After 2 more minutes, spray the loaves and the oven walls again.

Bake for 12 minutes, then lower the oven temperature to 400 degrees F and bake for 25 to 30 minutes longer until the loaves are golden brown and crisp. Move them to a rack to cool.


It is quite different isn't it?
 
OK I made ittttttttttttttttttttttttttttttttttttt !! Yes i think thats it! D :D :D :D

Ok I followed this time being so carefull not to make the same mistakes, I lightly oiled the bowl, shaped it so gently ( it did deflate alot though) I mean I couldn't ever get that raw picture !! but then it started rising back so it was fine ( i guess)
I baked it at 450 for 20 minutes and 400 for 10 minutes again, so a total of 30 minutes.. Didn't slice into it until it was really COOL ! took around 45 minutes..
The flavor was obviously great, the crunch was good ( I placed a pan of hot water in the oven before baking them) . last time it was real dense.. this time it was quite airey and fluff.. Not like my recipe though :( But it's so acceptable I mean I just loved it ! I'm really pleased with them!

Hope you all try them & give me your feedbacks please SF :D
 
hi pancake

:P - :P - :!: Success - Hurrah :!: - :P - :P

:?: - :?: - :?: >> A QUESTION FOR YOU << :?: - :?: - :?

Now that you've baguettes with both recipes, do you prefer your aunt's recipe or the one from Peter Reinhart's book that was posted in the thread?

Inquiring minds + the idly curious want to know...TIA
 
If you want a recipe for Baguette, who they make it here, send me a mail. I´ve a interesting recipe from a baker... ;)

But I can show you the picture of my baguettes.


medium_bagu.jpg
 
hey there :D
just read your posts, well SF honestly both are great. I woyld never compare the flavor of the patte-fermente bread because it is absolutely great , while my aunt's tastes good but not as flavorful. While my aunt's is quite easier to make and sort of a fool-proof recipe which is more convenient. So what I planned is: weekends, I'd definately go for the patte fermentee baguette, it's tastes so good! while weekdays where U don;t have that much time or when you're having people over and can't afford to mess it up, I'd go for my aunt's recipe :D I wish I would reach a stage where I can be so confident making those patte fermentee baguettes again without worrying one bit it'll come out dense. It's so sensitive and needs alot of shaping and handling practice, well I'm after it :D
Sf, i'd love to hear your feedback and comments on both recipes and your comparison.

karaburun, i'd love to have that recipe! Thanks.
 
my Freeform Loaf with Preferment - Part I

[size=+3]my Freeform Loaf with Preferment - Part I[/size]

with apologies to Lewis Carroll
"The time has come," the Walrus said,
"To talk of many things:
Of bread--and stoves--and temperatures--
Of oven loft in recipes--
And why this dough just will not rise!
ah Reader! Help me please."​

[size=+1]A Few Preliminaries[/size]

Having poured over pancake's valiant and ultimately successful venture making Peter Reinhart's baguette recipe using "pate fermentee", I too was inspired to attempt a bread using "pate fermentee" where the loaf is baked freeform on a flat surface rather than in a loaf pan. I chose his recipe for Pain de Compagne (aka Country Bread) which is quite similar to his baguette recipe posted in this thread.

In his discussion, Reinhart assures us that
This particular dough never disappoints.
Alas, I hereby attest and affirm that it does disappoint, at least it unkindly did so for me.

Now whether this is due to...
> my inexperience and ineptitude making freeform loaves
or
> my failure, to date, to purchase the baking stone I lust after
or
> a peculiar spitefullness towards me by the spirits of grains and flour
or
> some other cause which has yet to be determined by you, dear Reader
...it remains that my attempts to date have ranged from total failure to only partial success. While the bread rises quite nicely in the bowl it fails to rise much in the oven, resulting in a loaf with a dense crumb, not the open-holed "airy and fluffy" product achieved by pancake.

I now proceed to share my...

[size=+1]Failures and One Partial Successs[/size]

My Failures: Baking Directly on the Pan

In these attempts, after the dough had risen in the bowl, I simply shaped it into a ball (aka a boule for you Frenchies out there) and let it rise on a small pizza pan well sprinkled with coarse corn meal. When the dough had risen approximately 1-1/2 the original size, I put it, still on the pan, into a preheated 500F oven, steamed the oven by pouring 1 cup simmering water into a preheated castiron frying pan on the floor of the oven, reduced the heat after 5 minutes to 450F and hovered anxiously in the kichen until it was done.

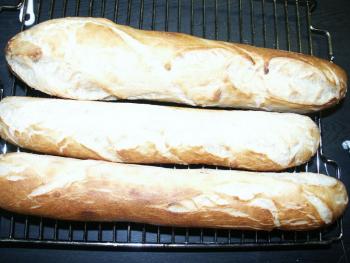
Here is the last attempt (my first attempts were so pitiful I would blush to show them). The bread managed to rise about 1 inch during baking to a glorious height of about 2-1/2 inches. (It was also overbaked by about 5 minutes so it came out too dark but I got distracted by other things towards the end.)
countrybreadattempta9ak.jpg

(Please don't ask me to tell you why the bottom is bowed upwards - I'm clueless.)

My Partial Success: Baking on a Castiron Grill

In some bread book (possibly Carol Fields' The Italian Baker) the author mentioned one could use castiron in lieu of a baking stone. I was skeptical, thinking that it would just burn the sh!t out of the bottom of the bread, but frustration with my prior attempts made me reckless. What had I to lose except untold hours and my rapidly fading reputation as a bread-baking wiz?

castirongrill5ur.jpg
This is what my castiron grill looks like

This time I shaped the dough into a rough cylinder (aka a batard for you Frenchies out there) and let it rise on an inverted small pizza pan well sprinkled with coarse corn meal. I preheated the oven (with the grill pan and fry pan in it) to 525F. When the dough had risen approximately 1-1/2 the original size, I sprinked coarse corn meal on the grill pan and slid the dough onto the grill pan, steamed the oven by pouring 1 cup simmering water into the preheated castiron frying pan on the floor of the oven, reduced the heat after 5 minutes to 450F and again, hovered anxiously in the kichen until it was done.

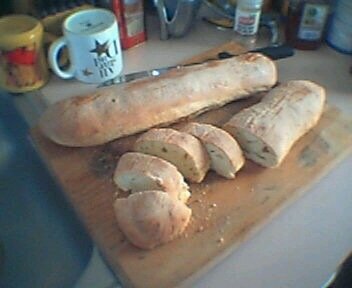
This time the bread managed to rise about 2 inches to a final height of 3-1/4 inches. The shape of the loaf would not win a prize but the bread had a more open interior and was a taste improvement over my prior efforts.
countrybreadattemptb7sb.jpg


This is a closeup of the loaf's interior. (I need to RTFM for my digital camera to figure out how to do better closeups)
countrybreadattemptbinteriorcl.jpg


[size=+1]Miscellaneous Comments[/size]

FYI, I do have an accurate oven thermometer, so the temps I cite are correct.

The castiron surface seems the way to go. While the oven temp was slightly higher, I think the preheated surface is the main contributor to the better oven spring.

[size=+1]Last Requests[/size]

All readers are earnestly and shamelessly solicited to contribute
  • pearls of wisdom
  • words of encouragement
  • or any other comments you see fit

TIA - SF [1302]
 
Last edited:
man that looks good subfusc. i can almost smell it from here. i am a huge bread fan (getting bigger all the time ;) ). people are always saying that bread made in the middle atlantic states is the best in the usa. why do you think that is? temp and humidity, barometric pressure, water, etc...
 
SF, I applaud your valiant efforts and persistence. And hang my head in shame because I said I would join in this enterprise and have not done so to date.

I am just too engaged now to try this, but I love reading what you are doing and want to encourage you to keep on going!

Just remember that only the sun is guaranteed to rise dependably.
 
I'm not sure where this "Quick Reply" message is going to go, but I hope it goes into the thread.
Okay, I am going to read the thread and see what I can glean from the messages because I am brand new at baking, which I love, but I use my Oster 2-lb bread machine to make the dough and I go from there. I have been very successful with my breads so I am not far off. But I am not happy with my crusts. Especially with Spanish Pan and Cuban breads. It's too thick and too tough. And the bread gets really hard quickly.
Welll anyway, I would like to join this nice crowd, it looks like fun.
Pete
 
I don't know how I missed this thread. Looks like you all have been having fun.

Mostly I bake plain white bread: flour, water, yeast, salt. Gave up measuring, because there are just too many variables. I simply adjust the flour/water ratio as I go until the dough feels right: almost but not quite sticky, smooth, soft, and pliable. Then I usually let the dough rise, covered, for an hour at room temp (70-75F), form a loaf, then let it rise for about the same time/temp again.

I often use a "biga" or "sponge" or "starter" or whatever you want to call it. Basically I simply make a batter of the above ingredients and let it sit, covered, for varying amounts of time. 24 hours (+ or -) results in a pleasant flavor. 72 hours and you have sourdough starter.

Then I simply add flour to get the consistency desired. Softer, wetter bread if using a loaf pan, a little more dry and stiff for artisan type loaves.


WHITEBREAD.JPG


For a thick, crisp crust, I set the oven at 400 to 450. For a thin, softer crust, 335 to 350. 375 seems a good "general purpose temp for me.

Baking time varies with the size of the loaf, of course. Tapping for a "hollow sound" tells me when its done.

For variations, I may add milk, eggs, butter, oil, olive oil, herbs, and/or brush the loaf with milk or an egg wash and sprinkle with sesame or poppy seed, minced rosemary, etc.

Hope all of you enjoy bread making as much as I.
 
Last edited:
Baking Temperature Tricks

Looks like the temperature is the key. Higher, thicker and lower thinner.

I will try my next batch at a low 325 to see what happens.

And, of course I need (and will) purchase some baggette pans so the shape will hold up instead of falling into a flat shape loaf.

And adding eggs, butter, olive oil, milk does make the bread very very tasty. Everyone loves the loaves.

Thanks gang.
pete
 
Bread making #101

Oldcoot:
Thanks Pal. I don't measure any longer either. I just go by "feel" as you do.
The only thing I need is baggett pans to hold my dough so it doesn't flop down. I'll get some this week end and bake when I have time.
And I'm going for a lower temp, and adding milk, eggs etc to make the bread as tasty as possible. And also addes shelf time too. It lasts a few days longer than without.
Then when I get this correct, I will expand my baking avenues of posibilities.
Pete
 

Attachments

  • 33797041925.jpg
    33797041925.jpg
    23.9 KB · Views: 268
Just for fun, I decided to give some of the suggestions on this interesting thread a good try.

First, the "Biga" thing. Using the posted "Bakers' Percentages" (100% flour, 74% water, and 0.2% AD yeast) I made my biga - or rather bighino, I guess - using 5.4 oz AP flour, 4 oz (1 cup) warm water, and 0.1 oz AD yeast (estimated based on pkg weight of .25 oz).

BIGA002copy.JPG


Then mixed with KA paddle for 2 min., forming a thick, pancake batter - just pourable.


Covered the bowl tightly with plastic wrap and set aside at room temp (75F day, 60 F night) for 23 1/2 hours. Had a pleasant, slightly sour aroma. Half an inch of water on top.

Added 2 cups AP flour (stirred cannister, spooned flour into measuring cup, scraped level with knife) each of which weighed 4.5 oz. Added level tsp salt, 2 tbsp Olive Oil (all that was left in the bottle!).

Mixed 10 min. with dough hook at low speed. Formed a soft, satiny dough that just "dripped" off the hook, and was slightly sticky. Formed a ball and placed in a covered, oiled bowl at room temp for 1 hour.

BIGA010copy.JPG


Formed dough and placed it in pyrex loaf pan. It took 2 hours to double!
BIGA011copy.JPG
BIGA012copy.JPG


Into a preheated 400 F oven for 35 minutes. I expected addtonal rising in the oven - didn't happen! Sometimes it does, sometimes it doesn't. Howcum???? Anybody????

Here's the result: Flavor not great. Slightly sour, but not that nice "sourdough" kind of sour. Texture fair, a tad heavy for my liking. Nice thin crust,'tho. Loaf weighed 1.2 lbs.
BIGA014copy.JPG


Conclusion: Bigas, sponges, etc. are fine, and add flavor and may improve texture some, but I have had equally good or better results without them. So I am still undecided. And far from convinced that careful measuring is much of an advantage. The texture of the dough after kneading seems to be the most indicative of the final result. But I am a rank amatuer, so don't take my word for it!
 
Last edited:
oldcoot:

"The texture of the dough after kneading seems to be the most indicative of the final result."

This a quote from your last message and I couldn't agree more!

I also think measuring is a waste of time. I just go by what the dough looks and feels like and it turns out good.

And I am turning out better breads with thinner crusts with longer lower temperatures. When I require a bread with a thicker harder crust I will go back up!

My neighbors who I hand my bread samples to for their judgement say it is perfect and that I am a good baker and should open up a bakery. Well, I am flattered to say the least.

But thanks oldcoot for all of your help.

Oh, and also, I am not bothering with all of that starter stuff. Don't need it at this point. I would like just to get really good at bread making (#101) at this stage, then I can graduate sometime in the future.
 

Attachments

  • 35589419653.jpg
    35589419653.jpg
    25.3 KB · Views: 242
Back
Top Bottom