Bread Making Invite 4 All - a Collaborative Bread Thread

The friendliest place on the web for anyone that enjoys cooking.
If you have answers, please help by responding to the unanswered posts.
What a great link! It's really informative and the formatting is easy to read!:)
 
Subfuscpersona:
My goodness you sure are thorough! I'll have to give you your "Masters" for this theisis!
I think it is all just fine, but way, way above me and my efforts to bake bread. My bread is fine enough for my needs without going into all of those precise measurements, weights and dutiful instructions.
Your pics didn't come through for me so I was in the "dark", however I read everything and especially about the "mysting of the oven" and about the "baking stones", which I may purchase to enhance my bread.
Now that it has cooled down temperature wise here in Florida, I can start to bake again. And because of your advise I will treat my dough a little more tenderly at that last stage.
I have baking baggette pans now, so the loaves stay up and are rounded ofcourse.
Keep up the good work and I will stay tuned for further developments.
 
What a wonderful thread !! Many thanks to everyone who contributes and make this as helpful as it is :chef:

Goodweed, I want to try your bread recipe. It looks pretty easy and quick, and after all your recoomendations--it must be good. I have one question though, when you say: " Place 3/4 of the bread dough into a loaf pan (it should half fill the pan) and place back on the hot water. Again close the door" Where does the pther 1/4 of the dough go? Does this make 2 loaves?
Thanks!

subfuscpersona, your attention to details is great! I don't generally use a scale either but I might try it. Thanks for all the tips and hard work! I've printed it out and will re-read it after work, hopefully I'll have the time to make it over the weekend :) Thanks once again!
 
pancake said:
What a wonderful thread !! Many thanks to everyone who contributes and make this as helpful as it is :chef:

Goodweed, I want to try your bread recipe. It looks pretty easy and quick, and after all your recoomendations--it must be good. I have one question though, when you say: " Place 3/4 of the bread dough into a loaf pan (it should half fill the pan) and place back on the hot water. Again close the door" Where does the pther 1/4 of the dough go? Does this make 2 loaves?
Thanks!

subfuscpersona, your attention to details is great! I don't generally use a scale either but I might try it. Thanks for all the tips and hard work! I've printed it out and will re-read it after work, hopefully I'll have the time to make it over the weekend :) Thanks once again!

Pancake; My family is very fond of yeast fry-bread. We call them scones, though they aren't really. You take the remaining dough and divide it into 4 to 5 equally sized pieces. Roll them into balls while you heat about an inch of sunflower oil in a heavy skillet. Then flatten the dough-balls between your hands and stretch them as you would for a pizza, working from the center outward. Then drop the flattened dough into the hot oil and cook until golden brown on one side, flip and repeat. Top them with everything from butter and honey, to your favorite jelly, or syrup, or with EVOO and garlic. They are very versatile.

You could also take the remaining dough, roll it out into a 8"X12" rectangle. Cut lengthwise into 4" wide by 8 " long pieces. Roll your favorite sausages, or hot dogs in them and place them seam-side down on a parchment paper-lined cookie sheet. Let rise and bake up some great pigs-in-the-blanket.

Just a couple ideas for ya.:chef:

Oh, and lest I forget, subfuscpersona's report on her breadmaking is amazing. It's very well done, very profesional. subfuscpersona, I salute you.

Seeeeeya; Goodweed of the North
 
I just looked at the butter-sponge bread recipe that I posted earlier. Something was nagging at me in my dubconsious about it. I noticed that the amount of salt given for the recipe was 4 tsp. That is wrong. I always use about 1/2 tsp per cup of flour when making any type of bread, or quickbread. More than that will make the final product too salty. So for the 5 cups of flour in the recipe, use 2 & 1/2 tsp. salt.

Sorry 'bout that.:wacko:

Seeeeeya; Goodweed of the North
 
Goodweed, Thanks for the clarification :) I love the fry dough idea, I've never tried that! I'll let you know as soon as I make it:chef:
 
Cuban Bread making 101 + Butter-Horn-Rolls

Well you all....here is my report. Remember I was trying to make Cuban bread for Cuban sandwiches. Cuban bread is only flour, water salt and sugar. The directions came from a cook book (including Cuban Bread of course), about cooking in the Keys (Florida Keys). "Cookin' in the Keys by William Flagg.
The most outstanding thing I found about the recipe is that you start with a cold oven! And to place a pan of boiling water. Then put the bread into the oven and turn it on and set it for 400 degrees.
I duitiful carried out the instructions and the bread turned out just great. Pictures of the loaves and of the inside of the bread are enclosed.
This weekend I made some butter-horn-rolls. I took them to a party and everyone said they were perfect. Photo also enclosed.
All in all a very nice baking week end.
Hope you all had the same.
 

Attachments

  • DSC00066.JPG
    DSC00066.JPG
    122.8 KB · Views: 199
  • DSC00067.JPG
    DSC00067.JPG
    121.2 KB · Views: 208
  • DSC00068.JPG
    DSC00068.JPG
    114 KB · Views: 194
  • 99850916229.jpg
    99850916229.jpg
    25.6 KB · Views: 214
Last edited:
Pete, what great pictures! The bread looks so good. The butter horn rolls look like something a local bakery makes, they put a hotdog or sausage in the middle. It's really yummy. Thanks for the great pics!!!
 
I can make Butter-Horn-Rolls now so I am moving on to Cuban Bread. This last batch turned out okay but not perfect yet to my estimation. So much fun trying to get it right.
 
semolinaBaguette-exteriorView.jpg


"A loaf of bread," the Walrus said,
"Is what we chiefly need:
Pepper and vinegar besides
Are very good indeed--
Now if you're ready, Readers dear,
We can begin to feed."

"It was so kind of you to come!
And you are very nice!"
The Carpenter said nothing but
"Cut us another slice:
I wish you were not quite so deaf--
I've had to ask you twice!"

Many thanks to all for comments and feedback. BTW, problems with the pix in my link my Freeform Loaf with Preferment - Part II as reported by Pete on 12-07-2005, 09:44 AM were fixed within a few hours of his posting.

Special thanks to all who have made this thread such a success and a happy holiday to all -

SF
 
Last edited:
Potato Rosemary Bread

Peter Reinhart's The Bread Baker’s Apprentice is the best book I know of on the art of making bread.

This link to his Potato Rosemary Bread recipe comes straight from his book

The bread is made with a biga preferment and the link includes his biga recipe (scroll down to the bottom). The recipe is somewhat time-consuming but the end product is delicious.

SF [4896]
 
my Freeform Loaf with Preferment - Part III

my Freeform Loaf with Preferment - Part III

Hello fellow bakers!

I've been experimenting with my basic recipe for my Freeform Loaf with Preferment Part II and working on my shaping technique. Here are some observations...

Manipulating the Biga for Flavor

I keep 8 OZ frozen packets of biga in my freezer. Inspired by some other posters to this thread, after the biga had defrosted overnight in the 'frig, I let it sit on the counter at room temp for about 2 hours. As it rose it developed a more pronounced yeasty aroma which I hoped would give more depth of flavor to the final bread - it did! If you're making a big batch for freezing keep the biga at this stage fairly "neutral" (that is, don't let it over-rise or get too yeasty). However, feel free to experiment with an additional rise for the biga in your final baking.

Developing Technique

I've been working on my shaping technique. While you still must be gentle with your dough there is a technique for shaping that creates more surface tension (that's what the books call it folks - I didn't invent the term). More surface tension means the dough has better oven spring when baked. Sorry, no pix for this one but I'll try to take some during my next baking and post them. You can feel and see the difference in the dough's surface if you do it right.

Expanding my Equipment Arsenal

I got two small oval baskets from a 99-cent store - each is about right for 1 to 1-1/2 lbs of dough. They're just plastic but they work great as a rising container. Line the basket with an old cotton cloth tea towel or napkin. Dust the cloth well with flour so the dough won't stick to it during the rise.
proofingBasket.jpg


As noted in my Freeform Loaf with Preferment Part II I use parchment paper to keep the risen dough from deflating when slid onto the baking surface. If you're using a basket as the rising container, first put a piece of parchment paper, lightly dusted with flour, on an upside-down baking sheet. Gently tip the risen dough onto parchment paper. Slash the dough and slide it, parchment paper and all, onto the baking surface. This leads directly to my last observation...

Put the Cornmeal Under the Parchment Paper

Picky family members said they didn't like the bread's bottom being "crunchy" from the cornmeal so this time I sprinkled the cornmeal directly on the baking surface just prior to baking and had the risen dough on parchment paper lightly sprinkled with flour. Slid the parchment paper with dough onto the cornmeal-sprinkled surface. Good oven spring and no cornmeal on the bottom of the finished bread.

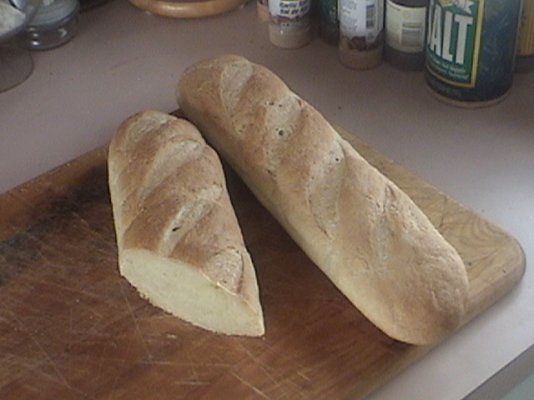
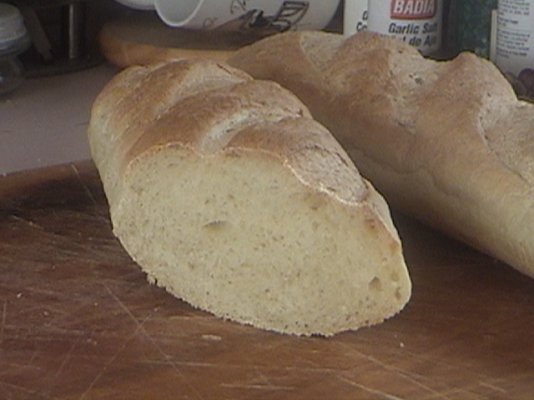
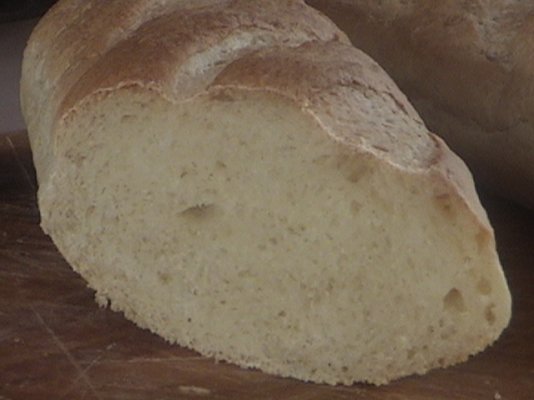
Here's a pix of the final bread. It was an oval loaf raised in my new basket and baked on an upside-down large castiron frying pan that had been preheated in the oven. (BTW, I don't bake directly on a pan because my experiments showed that a preheated surface gave better oven spring. I still don't own a baking stone so I use castiron.) Perhaps due to that surface tension I'm learning to do, the oven spring was 1-1/2 inches as opposed to the 1 inch oven spring I've previously gotten. The interior structure had nice irregular holes throughout.
myFreeformBread-InteriorView-2006-01-22.jpg


Baking temps were the same as those given in my Freeform Loaf with Preferment Part II but the baking time was about 30 minutes (instead of the 25 minutes for a baguette shape).

SF [5501]
 
Last edited:
Ciabatta Bread

I discovered this thread recently and have been pleasantly surprised by all the information available. It has been genuinely informative, as well as something of a burden. Since making bread with a prefermented starter and tasting the results, I no longer can imagine making italian/french breads without a biga.

I have since tried making normal ciabatta bread 2 times and have experienced fairly positive results. Here is what I did:

Add a small amount of dry active yeast (I put about the size of a nickel into my palm) and mix it with 3 tablespoons warm water. Wait 10 minutes or until mixture is creamy. I then add about 1 cup white flour (type 405) and 3/4 cup room-temp water. These are estimates. Stir well until it looks like a batter. Let sit for 24 hours (approximately).

After 24 hours, the starter is bubbling and has risen a fair amount, but not a lot due to the small amount of yeast added. I then take about 3-4 tablespoons warm milk and add about half a package of active dry yeast (approx 1 teaspoon) and mix. Wait 10 minutes or until creamy. I then add it to the starter, 2 cups white flour (type 405) , 3/4 cup room-temp water, 1-2 teaspoon sea salt, and 2 tablespoons olive oil. Mix well.

The first time I did this, I mixed enough flour in so that it began to pull away from the sides of the bowl, and was possible to handle and kneed (but continuously having to add small amounts of flour in order to prevent sticking). After needing for about 5 minutes, I put the still rather sticky ball into an oiled bowl, covered with plastic wrap and let rise until doubled. I then slid it out of the bowl, cut it in half, formed two ciabatta rolls (long ovals) that were about 1 inch high and a bit sticky. I set them on floured parchment paper on a cookie sheet.

The second time, I did not add enough flour in order to be able to properly kneed the bread. I just mixed with a wooden spoon for about ten minutes until the dough barely pulled away from the sides, slowly adding perhaps another 1/4 cup flour, but was still verrrry sticky. I let it sit in an oiled bowl, covered with plastic wrap, for about 1-1.5 hours. I then slid it out onto a very well floured countertop, cut in half, covered the outsides completely with flour (otherwise not possible to handle), rubbed the flour in slightly, and set on floured parchment paper on a cookie sheet. They settled into about a 1 inch high ciabatta oval. The dough was definitely much "wetter" than the first time.

I handled the dough verrrry carefully both times.

Both times I preheated to about 475 degrees with a cast iron pot on the floor of the oven (I do not own a baking stone, unfortunately). After letting the ovals rise about an hour (with a cloth over the baking sheet), and the oven preheat for 30-45 minutes, I put some hot water into the cast iron pan, let it steam for a few seconds, then added my bread. I subsequently threw in another small amount of hot water after 30 seconds and again after 1 minute. I then turned the heat down to about 425 and let bake for about 20-25 minutes or until the crust was browned.

Removed to an oven grill and let sit for 45 minutes.


The end results were actually very similar. Very light loaves, with nice air pockets inside. I had an oven spring of about 1-1.5 inches both times. The second loaf's crust was I think a bit softer (possibly due to difference in temperature or length of baking), but both had nice flavor and texture and I would rank both of them as a tasty success.

Positives: Both loaves look nice, taste great, and it seems that despite the major difference in kneeding, both came out quite similar. They also smelled wonderful.

Negatives: I still have been unable to get the nice crunchy crust, even with other breads. I think my oven may not get hot enough, or I do not bake long enough (they were already quite brown when I removed the breads). Any suggestions would be great. As a poor student/intern living in Germany, I cant afford a baking stone.


It would be great to get this thread going again, its such a fun thing to read. Next time I try, I will post some pictures. Otherwise, I welcome comments and suggestions and I hope to see this thread come alive once again.
 
welcome to this thread

ooooooo...its alive...and we're international!

what a neat post ... I love bread-baking experiments because I learn so much from them... I hope you can post some photos also.

You might want to check out posts from DC member karaburun who also lives in Germany. On popular request, she posted a baguette recipe to this forum and her DC profile page says Ask me, if you want some original German recipes.... I bet she could be helpful.
 
I can't believe how popular this thread is! I get constant emails on the updates of additions to this thread! I think I've learned more from this thread than any bread book I've used, thanks for everybody's efforts and participation!
 
as promised over a year ago, i finally got around to using my old breadmaker, and cranked out a loaf of white bread. it was a box mix from hodgson mills that i found in our pantry. it actually came out pretty good, to my surprise.

so i ran to the store and bought their other boxed bread mixes, including caraway rye, european herb and cheese, and another white bread.

i'm gonna make the european herb and cheese tonight, and modify it with some more cheese, and some fresh herbs.

i forgot how much fun it is to make bread, and how great the house smells afterwards. even if it is just dumping ingredients into a machine.
 
amcardon said:
I can't believe how popular this thread is! I get constant emails on the updates of additions to this thread! I think I've learned more from this thread than any bread book I've used, thanks for everybody's efforts and participation!
Thanks so much for your post. I think that this thread shows that DC members find a collaborative thread really useful.

A collaborative thread has [1] a theme or focus (this one focuses on bread baking using preferments) and [2] collects input in a single thread from many DC posters so that the accumulated experience of many people is available in one place.

If you build it, they will come. - I would urge DC members who are interested in a topic to start their own collaborative threads.

I started this one to learn and it has been my privilege to learn from many others. I hope people will not only read this thread but post to it so all of us can profit from your experiences. Remember, anything is welcome here as long as it is on topic.

I personally am working on a post that will elaborate on shaping techniques for that elusive surface tension using photos as a guide. I may also include photos illustrating the effect of various slashing techniques for the final baking.

I don't pretend to be an expert - I'm NOT - but I would hope anyone interested in this thread feels free to post their own experiences - others with appreciate it and learn from YOU.
 
subfuscpersona:
You do that please I for one will be awaiting your research! Especially on the slicing of the tops, how, methods, and when!
I've slashed after the final rise and found the bread deflated! As a sresult I slash after I shape the loaves! Interested in what you find out.
 
Back
Top Bottom