Chinese Pork Ribs

The friendliest place on the web for anyone that enjoys cooking.
If you have answers, please help by responding to the unanswered posts.

Golfgar4

Senior Cook
Joined
Apr 4, 2007
Messages
199
Location
Janesville, Wisconsin
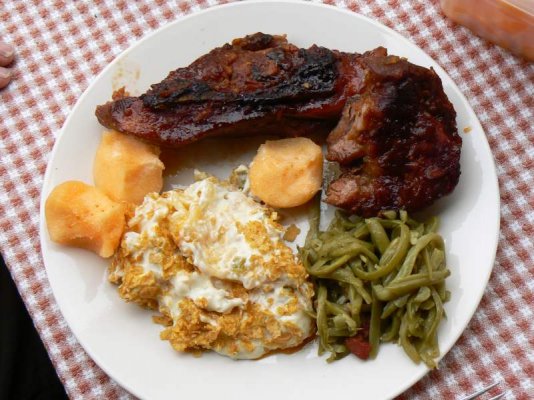
For our Dutch Oven Monday meal this week, we converted another slow cooker recipe for dutch oven cooking. This week, we tried Chinese Pork Ribs. These are country style ribs with a sauce made with soy sauce, ketchup, orange marmalade, and other spices. It was very good.

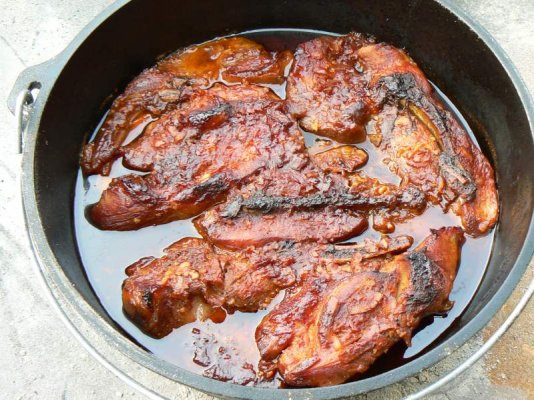
We had 5 lbs. of ribs, and we cooked them at 350 degrees for 3 hours in a 12" dutch. They came out so tender that the meat was falling off of the bone.

This is a nice change from the traditional barbecue ribs.

Chinese Pork Ribs

12” dutch oven

Ingredients

¼ cup soy sauce
1/3 cup orange marmalade
3 tbs. ketchup
2 garlic cloves, minced
3 – 4 pounds bone-in country style pork ribs

Directions

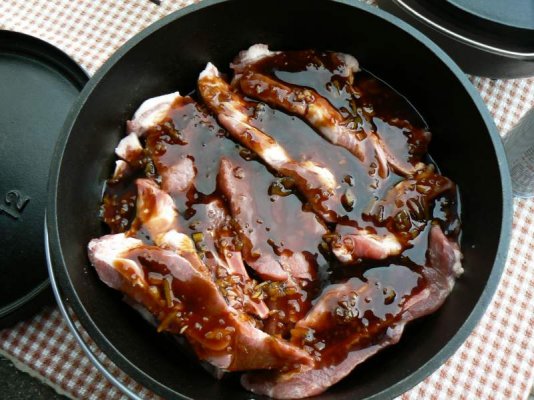
In a bowl, combine soy sauce, marmalade, ketchup and garlic. Pour half into dutch oven. Top with ribs; drizzle with remaining sauce. Cover the 12” dutch oven and cook at 350 degrees for 3 hours or until tender with 8 coals on the bottom and 16 coals on top.

Yield: 6 – 8 servings
 

Attachments

  • Chinese Pork Ribs1.JPG
    Chinese Pork Ribs1.JPG
    69.8 KB · Views: 253
  • Chinese Pork ribs2.JPG
    Chinese Pork ribs2.JPG
    97.2 KB · Views: 252
  • Chinese Pork Ribs3.JPG
    Chinese Pork Ribs3.JPG
    74.5 KB · Views: 249
Awesome. That looks incredible. The ribs look browned. Did that happen naturally in the Dutch Oven, or did you brown/sear the meat first?
 
Garry, those look soooo good! I don't have a dutch oven (yet ;)) so I was wondering if you could direct me to the slow cooker recipe you converted? And like Keltin, I'm waiting to hear how you got your ribs so brown. (Inquiring minds want to know.)
 
keltin said:
Awesome. That looks incredible. The ribs look browned. Did that happen naturally in the Dutch Oven, or did you brown/sear the meat first?

That happened naturally. All we did, as the recipe directed, was to pour in half of the sauce first, then place the ribs into the dutch (I put them on a trivet), and then pour the rest of the sauce on top. No browning or basting required. :)
 
Fisher's Mom said:
Garry, those look soooo good! I don't have a dutch oven (yet ;)) so I was wondering if you could direct me to the slow cooker recipe you converted? And like Keltin, I'm waiting to hear how you got your ribs so brown. (Inquiring minds want to know.)

Mom, the ONLY difference in the slow cooker recipe from the one I posted is that the slow cooker version says to cover and cook for 6 hours or until tender. That's the ONLY difference!

I would wonder if the ribs would get as browned as they did in a slow cooker? There's top heat in the dutch that does that as a result of the sugar in the marmalade and ketchup. But with no top heat, they may not get browned in your slow cooker.

Oh, I must be honest. I cooked 5 pounds of ribs instead of the 3 - 4 the recipe calls for. But I don't think that would have affected the outcome, other than there was more to eat! ;)

We got the recipe from the Taste of Home Slow Cooker Recipes 2007 magazine.
 
Last edited:
WHY do people have to post pictures when I'm HUNGRYYYYYYYYYY?????????? Those look incredible! Thanks so much and I see ribs in my future! :LOL:
 
I am getting a preseasoned dutch oven this weekend and this will be the first thing I make since it looks so good. I was wondering if you have to do anything special to a preseasoned dutch oven. The description says it is ready to cook. Do I need to wash it first with soap and water? I heard that foods high in acid are not good for a dutch oven. Is this recipe considered acidic or is it safe for a new dutch oven?
 
Another question. What about the seasoning on the lid where the charcoal will lay. Do you have to do anything special to the top of the lid since charcoal lays on top of it directly?
 
If it helps the brand is Camp Chef. My girlfriend is getting it for me as a reward for fixing her car. It is unreal what mechanics charge for something as simple as changing a starter! ;)
 
Some people might disagree with me, but I've NEVER used any kind of soap when washing my DO's, even when they're brand new. You might want to rinse it, and even though it is pre-seasoned, I'd still wipe it down with a light coat of oil. DO NOT use any metal utensils while cooking with your DO. The metal can scratch the cast iron which will allow rust and removes the seasoning. My preference is to always use wooden utensils. And once you've finished cooking with it, simply wipe it out and season with a light coat of oil. If some of the food is baked on, you can boil a little water in it and scrub with a stiff nylon or cast iron approved brush.

As far as the lid goes, I always oil the the lid inside and out and the outside of the DO everytime. Some people don't, but I think it helps maintain the metal. Otherwise, nothing special is required for the lid.

I honestly haven't heard anything about high acidic foods being a problem for a DO. I've never worried about it and have never experienced any problems.

Camp Chef is good DO. My 10" is a Camp Chef, and I'm planning on buying Camp Chef's 12" deep soon.

I think you're girl friend is smarter than you think. She's giving you the DO as a thank you, but I bet she also realizes that she's going to get a whole lot of good meals out of it! :LOL:

Have fun with the DO.. Let us know how your meal turns out. I hope this was helpful.
 
Thank you so much Golfgar4!!!! I have read everyone of your recipes and I love the pictures! You are great at this! I can not wait to get started and I hope mine will come out at least close to what you have pictured. Wish me luck!

I will wash the new dutch oven it in hot water and then cook on it. I can not tell you how excited I am now to get started! I have been grilling and smoking for a while but this is new for me. We have this planned for Sunday so I am hoping the anticipation does not kill me! Thanks a million!
 
Golfgar4 is just my username, so please use Garry.

It's great to hear that someone is so excited about getting started in DO cooking. It's great fun, and everyone just loves what you prepare. There are so many great recipes out there that you could try something new every week. That's what we're doing with our Dutch Oven Mondays.

I hope your meal turns out well. Of course, no one here will object if you post pictures! ;) But at least report back and let us know how successful it was.

Good luck, and let me know if I can be of further assistance.
 
Please clarify for me... You put them in the oven at 350 deg. with coals on the top and the bottom??? What kind of dutch oven did you use that you can do this?
 
I was wondering the same thing. Thought I was reading it wrong. Is this cooked inside a regular oven or outside over a fire (cowboy cooking). If it is cooked inside a regular oven - No coals correct?
 
I was wondering the same thing. Thought I was reading it wrong. Is this cooked inside a regular oven or outside over a fire (cowboy cooking). If it is cooked inside a regular oven - No coals correct?

Yes, this is outside cooking. It is not over a campfire, but you use charcoal briquettes. The lid to the dutch oven is basically flat with a lip around the edge that holds the coals in place, and the oven itself has feet to hold it up off the ground. See the attached picture.

Definitely forget the coals if you're cooking inside a regular oven.
 

Attachments

  • Dutch Oven.jpg
    Dutch Oven.jpg
    1.9 KB · Views: 165
Thats what I was thinking but reading it and the other comments I doubted myself. Have you done these in a regular oven -- turn out the same? and cooking time the same?
thanks will try them they look great
 
Thats what I was thinking but reading it and the other comments I doubted myself. Have you done these in a regular oven -- turn out the same? and cooking time the same?
thanks will try them they look great

No, I've never done any of the meals that I've cooked in DO's in a regular oven. From everything I've read, cooking times should be about the same. But I'll NEVER agree that the recipe will turn out the same. I truly believe that the exact same recipe cooked in a DO and cooked in a regular oven will taste a bit different, and the DO will be the better of the two.

But that's just my opinion. :rolleyes:
 
The Adventure Begins!

I finally broke down and bought a Dutch Oven yesterday on the way home from work. Not really an impulse buy since I’ve been eyeing a DO for a long time now. A store here in town called “Dick’s Sporting Goods” carries the Camp Chef “Louis and Clark” edition of DOs. I got a 10 inch, 6 quart DO. It’s this one.

But, I didn’t pay that price for it. Dick’s had it for $24.99 which I thought was a steal. At that price though, I was worried about quality. Turns out, I had nothing to worry about. It’s a good DO. Very heavy and well made. It came with a free lid tool that makes lifting the hot lid a snap....a $9.95 value according to the text on box! :D

This particular DO was pre-seasoned, but the seasoning they put on it is rather thin, and I did find a few spots of bare metal. So I re-seasoned it myself before using it. Another odd thing about this DO is it has a “temperature probe channel”. This is a small little “dent” in the lip of the DO that allows you to slide a thin metal or wired probe into the DO while also having the lid on. I’m torn about that part of the DO.

The lid fits very tightly and actually doubles as an outdoor skillet or serving trivet. The lid has three legs on its surface (the same as the bottom of the DO). This means you can turn the lid over, place coals under it, and use the lid as a cast iron skillet for cooking. Neat.

The lid has a lot of raised decorations on it, and I as worried at first how this would affect placing the coals, but it didn’t have any negative affects at all.

To try it out, I decided to make this recipe for Chinese Pork Ribs. My first obstacle was where to put the DO while it was cooking. I came up with a quick make-shift solution of using an old outdoor table, two cinder blocks on top of that, and two slab blocks on top of those for a flat, even and heat resistant surface. Not the most elegant of solutions, but it works, and it’s high enough that I don’t have to stoop over or get down on my knees to check the DO.

Next, I had to figure out how many coals to use for my 10” DO (this recipe was originally done in a 12”). I’ve read the basic formula is 2 times the diameter for a temp of 325F. Mine is a 10”, so that meant 20 coals. I also read that the formula for placement should be minus 2 on bottom and plus 2 on top, so that meant 8 coals on bottom and 12 on top. I also read that every two coals added or subtracted equals 25 degrees in temp, and since this recipe called for 350 degrees, I added two coals to the equation for 13 on top and 9 on bottom.

I couldn’t find country style pork ribs, so I used Western Style. These are long, rectangular hunks of meat with the occasional small piece of bone. I’d bet they are just a Boston Butt that has been cut into rectangular pieces.

The 8 ribs I had fit perfectly in my 10” DO. I poured the sauce over the ribs, turned them a few times to cover them, then let them sit and marinate as I started the 22 coals in the chimney. When the coals were ready, I put my DO on the makeshift cooking area, I circled the outside of the lid with 13 coals and placed the remaining 9 coals under the bottom. I figured I’d get an hour of heat from those coals.

At the 45 minute mark, I started 23 more coals to replace the original batch. But I found that the original batch still had some life in them. I ended up discarding what was left of the first batch by placing them in a metal bucket and then replenished the DO’s supply of coals with a fresh batch. One hour later, I repeated this procedure. This gave me 3 hours of cook time across three batches of coal with 66 coals total being used.

Turns out, a batch of coals in this DO goes a LONG way. Whoops! I ended up overcooking the ribs big time! The DO is slow to come to temp, but it is also slow to lose heat and is very efficient at holding the temp. I could hear the sauce bubbling and cooking when I got close, and could also see the occasional puff of steam escape from the “temperature probe channel” in the lip of the DO. Not to mention that, when you got close to it, you could smell it cooking. Oh WOW, it smells so good as it is cooking.

I’ve learned I could get about 1 hour and 20 minutes of heat from a batch of Kingsford coals. Also, I think just 20 coals is enough to set the temp for good cooking (not the 22 that I used). Finally, I think the ribs were done at around 2 hours or so. I really should have checked them at that time with a fork for tenderness, but I was just so thrilled with cooking this way that I was actually looking forward to using another batch of coals. :LOL:

The meat was rather dry and crusted, but had really, really good flavor. Some of the thicker pieces were still semi-tender, and we ate them. The sauce had caramelized on some of the ribs and was sweet, almost like a candied sauce. Very nice. I’m going to take the left over pieces of meat (which remind me of “burnt ends”) and chop them up, then put them in a pot of wine and vinegar based sauce and simmer on low to see if it will loosen up enough for a few sandwiches.

This recipe is GREAT! Thanks Gary!!

But I blew it on cooking time. I underestimated how efficient the DO would be, and how far a batch of coals would go. Still, I wouldn’t consider this a flop at all since it was an absolute blast to cook this way. What an awesome and fun way to cook. I love it! As a first time out, I learned a lot, and am looking forward to many more adventures in DO cooking!

This weekend, I’m thinking of making a cheesy potato bread first, and then a main course. I’m thinking of doing Gary’s Apple Dijon Pork Roast, or perhaps his braised Sirloin Tips, or maybe his Coca-Cola Chicken. I’m leaning toward the Apple Dijon roast since it’s a bigger cut of meat and should take longer to cook (more time to play with the new DO)! :ROFLMAO:

Also at the top of the list for the future is DO Lasagna, Chicken and Dumplings, Chili, and Pinto Beans with ham hocks. Thus starts my adventures in outdoor DO cooking!
 
WOW Keltin!

When you get into something, you REALLY get into, don't you! :)

Sounds like you did just great in figuring things out regarding how to cook with charcoal. There are a number of "formulas" that people use to determine how many coals to use. I tend to use the one that doubles the diameter of the DO like you did, then divide that number by 3. Then I use 1/3 under the DO and 2/3rds on top. So for your 10" DO, and because I'm lousy at math, I'd double it to 20 but bump it to 21 so it's easier to divide by 3. Besides, it's hard cutting those briqettes into thirds! :LOL:

That formula generally sets the temperature at 350.

I also use the 2 coals equals +- 25 degrees, but I've learned that it's far from anything that you can count on. To me, the biggest problem in maintaining your temperatures is when you cook in windy conditions. The beef tips I made the other night were cooked in winds averaging 17 to 20 mph. When I determined the number of coals I'd need based on the formula I use, I just added 4 more coals to both top and bottom. I used the SWAG method of determing how many extra coals to use because of the wind. That formula is: Scientific Wild A_ _ Guess! :rolleyes:

Really, I guess I've reached the point where I determine how many "extra" coals might be needed just by experience and dumb luck.

Since you mentioned a fe of the other meals I've cooked, I'll vote for the Apple-Dijon Pork Roast. We were all sitting around discussing our meals he other night, and without question, that was the meal that everyone said they've liked the best......so far!

Keep up the good work. But by the comments that you've made about some of your future meals, I'd suggest that you RUN back to Dick's to get a couple more DO's! You're going to need them!
And remember to post pictures of your meals. ;)
 

Latest posts

Back
Top Bottom