Growing Oyster Mushrooms Indoors

The friendliest place on the web for anyone that enjoys cooking.
If you have answers, please help by responding to the unanswered posts.
This one took close to a month to produce. They did say that these were slow to start. I have another kit (different 'shroom) but I'm not starting it until this one is almost spent. I love mushrooms but don't want to drown in them.
 
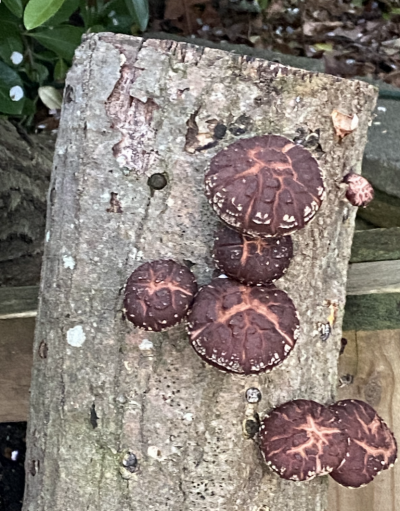
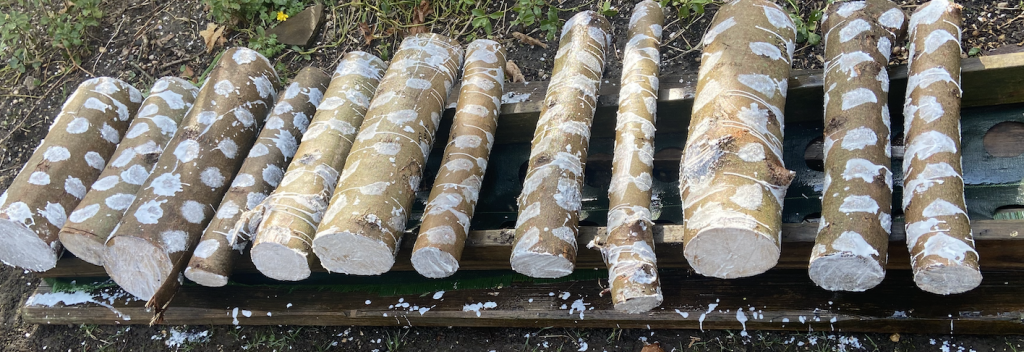
I've retired my indoor mushroom tent for the season. Now Im focussing on the outdoor mushrooms , primarily shiitake and wine cap. Inoculated 12 logs with various kinds of shiitake. They break them up into cool weather, warm weather and wide range specimens, I got 2 wide range varieties and 1 warm weather. The holes are drilled with a special bit that corresponds to the size and length of the innoculated hard wood dowels. Each hole about 6 inches apart . The dowels are then hammered into place. Wax is then placed where the dowels have been hammered in, the ends of the logs, and areas where branches were cut off . This is to conserve the moisture in the log. The logs are then placed in shaded areas to allow the spores to colonize the wood. I keep mine in range of one of my sprinklers, to keep it moist. It could take 6 - 18 months before producing, depending on the variety and conditions. I have 3 year old logs that are still producing. The logs I got last year took about 12 months to produce.

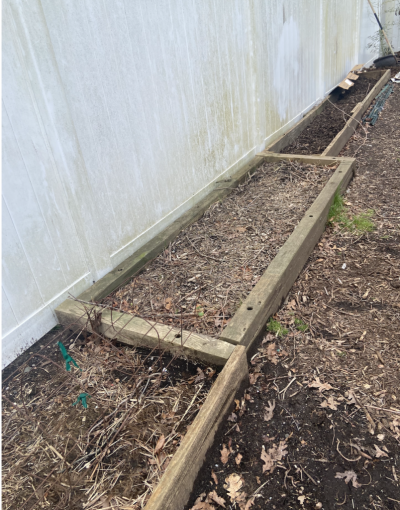
The wine cap garden consists of a layer of cardboard to keep weeds out, and direct contact with the underlying dirt. a layer of wood chips, then a layer of soaked straw. The inoculated saw dust is then sprinkled on the straw and worked in. Another later of wood chops is then placed on top of the straw . the top layer of wood chips helps keep the straw moist. The mushrooms grow faster on the straw , but once they inoculate the wood, they will produce longer, beaus the wood takes longer to break down . Using a combo of straw and wood gives the best of both worlds. quicker inoculation, and a bed that produces mushrooms longer. I keep the beds on the north side of the fence for shade.
 

Attachments

  • Wine cap.png
    Wine cap.png
    1.7 MB · Views: 112
  • Log1 .png
    Log1 .png
    1.4 MB · Views: 119
  • Mushroon Logs.png
    Mushroon Logs.png
    843.7 KB · Views: 129
Just built a new outdoor mushroom bed for Maitake Mushrooms . No pics yet, but basically a wooden frame about 2 ft by 5 ft. I lined the bottom with card board, filled a few inches with moist hardwood saw dust, placed the inoculated saw dust blocks on top of the saw dust. covered with the remaining moist sawdust , and then a few inches of relatively fresh wood chips. The saw dust and wood chips are more to keep the blocks from drying out than anything else . I also got a 'mushroom fruiting blanket'. Which you cover the bed in for both shade and to maintain the moisture. They say I should see mushrooms in a few months.

Usually this time of year I focus more on my outdoor mushroom beds ( Shiitake logs and Wine cap bed which are perennial ( for a few years), and the Almond flavored mushroom which is a warm weather mushroom and needs to be be reinoculated each year, and now the new Maitake bed). Once fall sets in, I focus on my indoor mushrooms ( Oyster , lions mane and a few others), but still periodically check the outdoor beds. Depending on the weather, a rogue few mushrooms pop up every now and then, even In the cold months .

That's the one thing I like about the outdoor mushrooms is their unpredictability. With other outdoor crops, I have a pretty good idea when I'll be harvesting once they make it into the garden. With mushrooms, you can get nothing for months , check the bed in the morning and nothing in sight just to come home from work and see a dozen full sized mushrooms, then nothing again for a month. What I dont like about the mushrooms outside are the slugs and if you have a mushroom that has deep gils, it's a great place for bugs to hide. ( indoor is basically bug free).
 
Its that time of year again
Started these oyster mushrooms on December 6th in a mushroom tent
Took a picture yesterday morning , then another today midday to compare and show the rate of growth on these things in slightly more than 24 hours.
I bet if I stared at them I could actually see them grow.
 

Attachments

  • Oyster 12:9@8:42.png
    Oyster 12:9@8:42.png
    1.2 MB · Views: 68
  • Oyster 12:10 @ 1:13.png
    Oyster 12:10 @ 1:13.png
    1.2 MB · Views: 62
  • Mushroom .png
    Mushroom .png
    1.4 MB · Views: 61
Mushroom Update: As most of you know, this time of year I focus on indoor mushroom growing since its too cold to do much outside , especially with the February we're having ( although I did manage to get 4 carloads of horse crap from a local Stable who offers it for free). Anyway, I got 8 grow blocks 2 Lions Mane, 2 Gray oyster, 2 Pioppini (Im sure Im spelling it wrong) and 2 King oyster.

All have different growing requirements ( Temp, humidity, light) so I usually grow one variety at a time. Some do overlap, so I could get away with growing different varieties simultaneously, but one of them would not be as productive, so not worth it.

I started the lions mane on 2/5, they started to ' pin' on 2/12, and harvest them today.
I decided to make a Lions mane ' Steak' with the first back ( still had a lot left over so I'll figure something out to do with them over the next few days.

Pic 1 is the pinning ( the mushrooms poking through the slits I made in the bag) 7 days after starting the block.

Pic 2 is the first harvest, 5 days after pinning, 12 days from the start. You can see they look a little pink. I read up on this and the lions mane, although usually white, can vary in color depending on humidity, temp, light ... The pink indicates it may have been a little cooler than ideal. Although I have a thermostat, I actually dont use it cause the room it is in normally stays within the temp range. I modify it by how much I open the door to the garage. Not an accurate method, but it works.

The next few pics are the cooking process. A little oil in a CI pan, placed mushrooms in the pan and applied pressure ( with another pan on top) to flatten, squeeze liquid out and to get a good sear on the surface. Flipped and repeated a few times til the desired thickens ( and sear). Seasoned a bit with S&P, Onion and Garlic powder and smoked paprika. Placed in oven for about 10 minutes, brushed with a little butter , removed from pan and made the sauce which was basically a modified BBQ sauce.

Plated with asparagus and potatoes/ onions.
Plating was a little sloppy, but actually pretty good for me.

The texture of the mushroom was perfect. The outer part was crispy/ chew and the inner part was typical mushroom texture, like a portobello. The interior flavor was of a mild mushroom, not too mushroomy.

By pressing and frying the shroom like this, it converts the very pom pom, pillowy texture to a crispy - chewy texture.

I may have posted all this the last time I grew / cooked with these. Below is the website I got the recipe for ( which I followed almost exactly, with a few tweaks).


Attachments

  • Pinning .png
    Pinning .png
    1.4 MB · Views: 66
  • Harvest.png
    Harvest.png
    1.4 MB · Views: 75
  • In the pan 1 .png
    In the pan 1 .png
    1.3 MB · Views: 61
  • In the pan 2 .png
    In the pan 2 .png
    1.4 MB · Views: 59
  • In the pan 3 .png
    In the pan 3 .png
    1.4 MB · Views: 73
  • Plated .png
    Plated .png
    1.5 MB · Views: 51
It's a 4 minute video on reduced dementia risk with including mushrooms in your diet. I think you'll like this one and if nothing else it will encourage you to use your mushroom powder in your cooking or for a supplement.

Mr bliss jokes weekly about how much smarter he feels eating blueberries every other day with oatmeal. I'm afraid to tell them of the benefits of the mushrooms we often eat, for fear of more joking around about how smart he is now. :ROFLMAO: He is smart but I don't know that I need to hear about it so often.
 
Just throwing this out there
One of the companies I get my mushroom growiing produucts from is doing a monthly lecture series ( starting mid February). I think it's $5 per lecture with a bundle deal. Lectures appear to be zoom.
Disclaimer: I only buy prroducts from this company . I've never participated in one of their lecture series , so I don't know any other details than what they mention. Could be great, could be crap. Im posting the link, and should I attend any ( wh ice I likely will), I'll post my feedback.

 
So the first lecture was last night, entitled " Mushroom 101". A basic intro class going of the basics ( most stuff could be found on their website, but there was continuous Q & A. Basic topics were various type of mushrooms you can grow at home, growing outdoors vs indoors ( techniques), different growth mediums , importance of environment to produce vigorous growth ( temperature, humidity ), tools and instruments for log inoculation, different types of inoculated materials and their benefits and purposes. And probably a bunch of other stuff that slipped my mind. I think the next lecture is specific for growing mushrooms on logs.
 
it sounds wonderful, informative. It's good they have the continuous Q and A with students like you, lots of experience.
it was well done. looking forward to the future lectures where they dive deep into things I either don't know about or need improvement . I'm making up list of questions I want answers to , due mistakes made in the past or unexplainable failures to unpredictable successes ( luck. Although luck is good, I prefer predictability ( although I'll take luck any time I get it)
 
I want to try to grow some mushrooms outside in straw. It keeps talking about sterilizing the straw with hydrating lime. I have zero idea what this means or how to use it once it is soaked.
 
The "safe" lime you want I believe is hydrated lime - which is what white wash is made from.
Sterilize (pasteurize) straw for mushroom cultivation by soaking it in a cold water and hydrated lime (calcium hydroxide) solution for 12–24 hours. This process raises the pH to 10–13, killing contaminants while hydrating the straw. Use a ratio of 2–4 grams of lime per liter of water.

You should be able to get some hydrated lime from you hardware store.
You should wear a mask and gloves. Mainly as the powder is so fine, like talc powder, you don't want to breath it. You don't need to try and sterilize your lungs. It won't hurt nor burn your skin but still wear them.
I used to make my own white wash for the chicken coop and would sprinkle it along with some Dia. Earth under the mats in the horse stalls.
 
they mentioned two methods. One is to soak in lime, as you mentioned . The other is to just soak the straw in water for a day or two to hydrate it ( I usually do it in a large garbage can that I use exclusively for something like that. For smaller batches, I usually soak in hot/ boiling water to kill off any potentially competing spores. The two key objectives are : 1) to hydrate the substrate ( straw) to make it an ideal environment for the mushrooms to form/ grow on. and second is to reduce ( or eliminate ) any other fungal strain that may take over, outgrow the mushroom you intend to grow in the bed. I remember watching a video where they soaked them in lime. and hung them in a barn to drain. totally out of my league or boiled them in huge boiling vats of water. This was a professional place.
 
Yeah, one thing to understand how professional places do things - with professional equipment. Yup, and then there's the home crafter... trying to minimalize it all... 😆
Exactly!
I do the best I can with what I got, and have been relatively successful with mushrooms. some varieties and methods are more finicky than other. And anything done outside relies on Mother Nature , the environment, and what she decides to do with it.
 
Larry you seem to have an incredible horseshoe hiding somewhere around. Your mushrooms are quite a success!

I need SPACE! another reason to lament the sale of the farm. LOL and now of course, I'm tired and although keen on many things just don't have the oomph anymore to follow thru.
Hence as I have mentioned several times - I will and do live vicariously through all of you in your adventures.
 
Back
Top Bottom