Do this right, and it will taste just like it came out of a chinese restaurant.
I kid you, not!
-------------------------------------
A few basic concepts before you get started.
Chinese wok cooking is done at VERRRRY high heat. For fried rice, the heat has to be so hot that it begins to sear the rice.
This creates a caramelization where rice is actually seared brown from the heat of the pan, and it also gives the rice that authentic “fried-rice” flavor.
It would be ideal to make this dish in a cast-iron wok over a gas flame, but since most western stovetops are not equipped to handle traditional Chinese cooking (and assuming you are using an electric stove), you will have to let your pan get REALLY HOT before you add the oil and start cooking.
1.) You really NEED a large frying pan to do this, because with all that flipping around, things can get messy.
2.) Where the normal rice-water ratio is 1:1.5, you’ll want to reduce the amount of water by making the ratio 1:1.25, so for each cup of rice you would add 1 1/4 cup of water.
3.) Use only peanut oil for the frying process. It really does make a difference in flavor, and won’t taste right if you substitute another type of oil.
4.) There are different kinds of chives. This dish requires the asian chive (aka, “garlic chive”),. It is as long as a green onion stalk, but it’s flat like an oversized blade of grass.
--Do not use western chives (“onion chives”), They look just like a miniature green onion, round stalk and all.
--Do not use dried chives. Dried chives are actually onion chives, the wrong type for this dish.
5.) Don’t be afraid to use Ajinamoto (MSG). A light sprinkle is all that’s required and you get more MSG in a bag of potato chips or a bowl of ramin.
--No Aji = No flavor.
6.) IMPORTANT: Once your ingredients are mixed, the final step is to allow the rice to sit in the pan without stirring until you hear the distinct “crackling” sound that indicates the rice is actually being fried. Let it crackle for minute or less (depending on the intensity of heat your stovetop can generate), then flip and stir the rice. Do this 3-4 times before removing the rice from heat.
Okay, we’re ready!
INGREDIENTS:
1.) White rice (cooked)
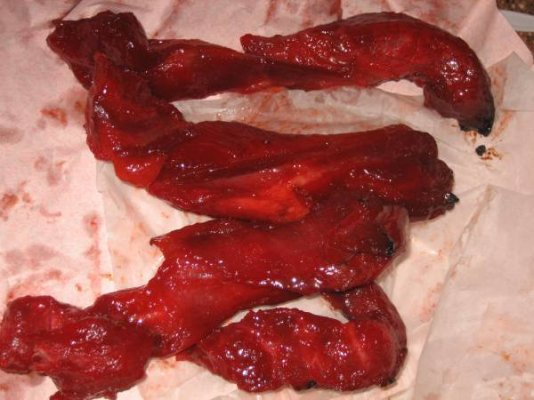
2.) Char-Siu (chopped)
3.) Fresh shrimp (peeled and chopped)
4.) Scrambled eggs (seasoned, cooked, and chopped)
5.) Chinese chives (chopped)
6.) Green onions (chopped)
7.) Garlic powder
8.) Onion powder
9.) Salt
10.) Ajinamoto (aka, “Accent” or MSG).
11.) Peanut oil
[You will find peanut oil, garlic chives, in oriental market. Ask where you can buy fresh cooked char-siu. Someone there should know.]
PREPARATION & PROPORTION:
1.) Scramble the eggs, seasoning them with salt, then fry them in a hot pan lined with peanut oil.
Use one egg for every cup of uncooked rice. So, if you are making 3 cups of rice, you will cook three eggs.
Simple!
2.) Shrimp should be portioned at a minimum of 1/4 lb. of raw shrimp per cup of uncooked rice. A little more is fine, so you can add 1/3 - 1/2 lb-per-cup of uncooked rice, and you’re still good. Peel them and chop ‘em up.
3.) Add a generous 1/3 cup of chopped char-siu for each cup of uncooked rice.
4.) portion 2-3 tbl spoons chopped chives for each cup of uncooked rice. The same goes for Green onions. Add 1/2 when you start frying, and mix the rest in just before you stop frying.
5.) Allow your cooked rice a few minutes to settle. To cool, remove it from the rice cooker and put it in a large bowl, then lift and stir the rice in front of an electric fan.
I usually make three cups of rice. Once it is cooked, I divide it into two parts just because it is too much to cook all at once.
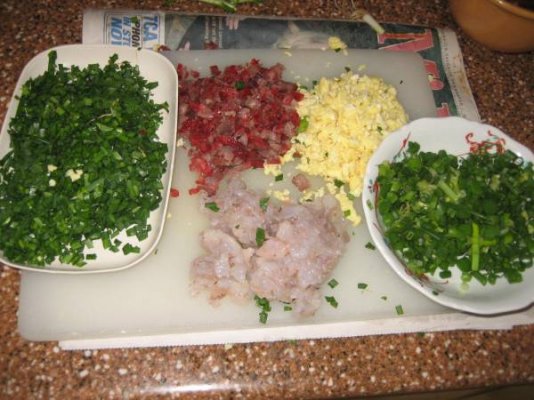
It is very unlikely that you will only make one batch of fried rice, so it is important to have all your ingredients chopped and properly proportioned for each batch.
INCORPORATION:
1.) In a large bowl, mix your first batch of cooked rice with chopped char-siu, shrimp, eggs, and chopped chives. Make sure they all get mixed together nicely.
2.) Get your hot pan ready. Add a generous table spoon of peanut oil across pan, then add the rice mix. Now you’re frying!
3.) After a minute, add the first round of green onions, then...
4.) sprinkle 1/2 tea spoon garlic powder over the rice immediately add 2 tea spoons of onion powder. Stir, then let sit to fry and crackle for a minute.
5.) Add desired amount of salt, and the remainder of chives and green onions. Stir and let sit to crackle again.
6.) Add Ajinamoto, stir once more, and taste to season.
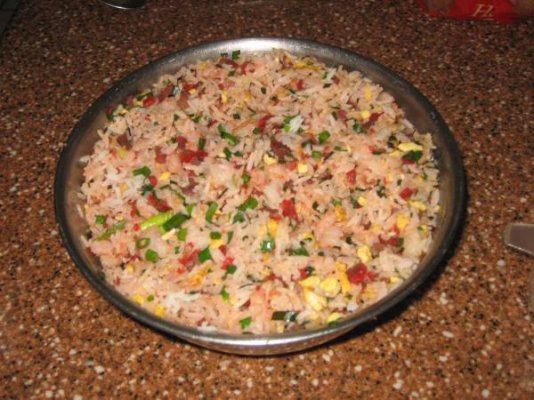
When done, remove from heat and place in a large bowl.
PLATE & PRESENTATION:
You can dress the plate up by packing the fried rice into a small, but nicely rounded bowl.
1.) Pack the rice all the way up to the top of the bowl.
2.) Put a plate on top of the bowl, then (holding both the top of the plate, and the bottom of the bowl), flip the bowl upside-down while it is resting on the plate.
3.) Gently tap the outside of the bowl to loosen it from the rice mound, then lift it away from the plate.
You should now be left with a perfectly formed mound of fried rice.
Garnish by topping with some chopped green onions.
I kid you, not!
-------------------------------------
A few basic concepts before you get started.
Chinese wok cooking is done at VERRRRY high heat. For fried rice, the heat has to be so hot that it begins to sear the rice.
This creates a caramelization where rice is actually seared brown from the heat of the pan, and it also gives the rice that authentic “fried-rice” flavor.
It would be ideal to make this dish in a cast-iron wok over a gas flame, but since most western stovetops are not equipped to handle traditional Chinese cooking (and assuming you are using an electric stove), you will have to let your pan get REALLY HOT before you add the oil and start cooking.
1.) You really NEED a large frying pan to do this, because with all that flipping around, things can get messy.
2.) Where the normal rice-water ratio is 1:1.5, you’ll want to reduce the amount of water by making the ratio 1:1.25, so for each cup of rice you would add 1 1/4 cup of water.
3.) Use only peanut oil for the frying process. It really does make a difference in flavor, and won’t taste right if you substitute another type of oil.
4.) There are different kinds of chives. This dish requires the asian chive (aka, “garlic chive”),. It is as long as a green onion stalk, but it’s flat like an oversized blade of grass.
--Do not use western chives (“onion chives”), They look just like a miniature green onion, round stalk and all.
--Do not use dried chives. Dried chives are actually onion chives, the wrong type for this dish.
5.) Don’t be afraid to use Ajinamoto (MSG). A light sprinkle is all that’s required and you get more MSG in a bag of potato chips or a bowl of ramin.
--No Aji = No flavor.
6.) IMPORTANT: Once your ingredients are mixed, the final step is to allow the rice to sit in the pan without stirring until you hear the distinct “crackling” sound that indicates the rice is actually being fried. Let it crackle for minute or less (depending on the intensity of heat your stovetop can generate), then flip and stir the rice. Do this 3-4 times before removing the rice from heat.
Okay, we’re ready!
INGREDIENTS:
1.) White rice (cooked)
2.) Char-Siu (chopped)
3.) Fresh shrimp (peeled and chopped)
4.) Scrambled eggs (seasoned, cooked, and chopped)
5.) Chinese chives (chopped)
6.) Green onions (chopped)
7.) Garlic powder
8.) Onion powder
9.) Salt
10.) Ajinamoto (aka, “Accent” or MSG).
11.) Peanut oil
[You will find peanut oil, garlic chives, in oriental market. Ask where you can buy fresh cooked char-siu. Someone there should know.]
PREPARATION & PROPORTION:
1.) Scramble the eggs, seasoning them with salt, then fry them in a hot pan lined with peanut oil.
Use one egg for every cup of uncooked rice. So, if you are making 3 cups of rice, you will cook three eggs.
Simple!
2.) Shrimp should be portioned at a minimum of 1/4 lb. of raw shrimp per cup of uncooked rice. A little more is fine, so you can add 1/3 - 1/2 lb-per-cup of uncooked rice, and you’re still good. Peel them and chop ‘em up.
3.) Add a generous 1/3 cup of chopped char-siu for each cup of uncooked rice.
4.) portion 2-3 tbl spoons chopped chives for each cup of uncooked rice. The same goes for Green onions. Add 1/2 when you start frying, and mix the rest in just before you stop frying.
5.) Allow your cooked rice a few minutes to settle. To cool, remove it from the rice cooker and put it in a large bowl, then lift and stir the rice in front of an electric fan.
I usually make three cups of rice. Once it is cooked, I divide it into two parts just because it is too much to cook all at once.
It is very unlikely that you will only make one batch of fried rice, so it is important to have all your ingredients chopped and properly proportioned for each batch.
INCORPORATION:
1.) In a large bowl, mix your first batch of cooked rice with chopped char-siu, shrimp, eggs, and chopped chives. Make sure they all get mixed together nicely.
2.) Get your hot pan ready. Add a generous table spoon of peanut oil across pan, then add the rice mix. Now you’re frying!
3.) After a minute, add the first round of green onions, then...
4.) sprinkle 1/2 tea spoon garlic powder over the rice immediately add 2 tea spoons of onion powder. Stir, then let sit to fry and crackle for a minute.
5.) Add desired amount of salt, and the remainder of chives and green onions. Stir and let sit to crackle again.
6.) Add Ajinamoto, stir once more, and taste to season.
When done, remove from heat and place in a large bowl.
PLATE & PRESENTATION:
You can dress the plate up by packing the fried rice into a small, but nicely rounded bowl.
1.) Pack the rice all the way up to the top of the bowl.
2.) Put a plate on top of the bowl, then (holding both the top of the plate, and the bottom of the bowl), flip the bowl upside-down while it is resting on the plate.
3.) Gently tap the outside of the bowl to loosen it from the rice mound, then lift it away from the plate.
You should now be left with a perfectly formed mound of fried rice.
Garnish by topping with some chopped green onions.
 But the recipe still looks yummy!!!!